There are cases when you want to have an iconic way of selecting a random value from a given list. In this tutorial we ware going to implement a fortune wheel.
Use case
In game or gamification context where speed is not the major interest but it’s about entertainment, a fortune wheel might be a good choice to let the user watch the app make a random choice based on a given list. A prominent example is whether or much you have won.
Goal
This is how the final implementation result should look like:

Requirements
Before we start with the actual implementation, let’s define the requirements that we apply to our fortune wheel:
- For every slice of the fortune wheel the value and the visual representation should be configurable. E.g: The value is 100 and the visual representation is a widget showing “YOU WIN 100 €”
- The background color of every slice should be configurable as well
- There should be an arrow indicator that shows which slice is currently selected whose turn speed should be configurable
- There should be a way of getting the current value and widget, also during the animation
- It should be possible to trigger the beginning of the spin from the outside
Implementation
Let’s begin with defining the different classes.
 1import 'package:flutter/widgets.dart';
 2
 3class FortuneWheelChild<T> {
 4  FortuneWheelChild({
 5    required this.foreground,
 6    this.background,
 7    required this.value
 8  });
 9
10  final Widget foreground;
11  final Color? background;
12  final T value;
13}
Our first class is the <code>FortuneWheelChild. The visual representation of this is one slice of the wheel. So the wheel widget is supposed to expect a list of FortuneWheelChild in its constructor to know how the wheel should look like. The FortuneWheelChild uses a generic type. That’s because we want to be able to statically check if the type of value corresponds with the generic type we provide for the FortuneWheel widget.
foreground is basically the visual representation of the value (like the above mentioned “YOU WIN 100 €” widget). background defines the background color.
 1import 'package:flutter/widgets.dart';
 2import 'package:fortune_wheel/widgets/fortune_wheel.dart';
 3
 4class FortuneWheelController<T> extends ChangeNotifier {
 5  FortuneWheelChild<T>? value;
 6
 7  bool isAnimating = false;
 8  bool shouldStartAnimation = false;
 9
10  void rotateTheWheel() {
11    shouldStartAnimation = true;
12    notifyListeners();
13  }
14
15  void animationStarted() {
16    shouldStartAnimation = false;
17    isAnimating = true;
18  }
19
20  void setValue(FortuneWheelChild<T> fortuneWheelChild) {
21    value = fortuneWheelChild;
22    notifyListeners();
23  }
24
25  void animationFinished() {
26    isAnimating = false;
27    shouldStartAnimation = false;
28    notifyListeners();
29  }
30}
For the implementation of the controller we are going to use a technique that is described in this article.
The controller is the link between the widget holding the animation and the presentation of the wheel and the parent widget that is interested in starting the rotation and receiving updates about the currently selected value. That’s why the controller needs to carry three variables:
- value
- isAnimating
- shouldStartAnimation
The value should represent the currently selected child and is to be updated by the animation on change. isAnimating exists to prevent the animation to start over when an animation is still running. The last one is the variable that is set to true when the trigger to rotate the wheel was received and to false once the animation has begun.
These variables are controlled by the four public methods of this class:
- rotateTheWheel()
- animationStarted()
- setValue()
- animationFinished()
In a common process, these methods are executed in the very same order they appear in the class declaration:
1.) The parent widget triggers a rotation of the wheel (e. g. because the user has tapped a button)
2.) Once the animation has started, it triggers the respective method
3.) On every updated being emitted by the animation controller, the new value is being sent to the controller
4.) When the animation is completed, it communicates this circumstance to the controller
Great! We have a widget representing a slice of the wheel and a controller being responsible for the communication. Now we need the core of the this app: the wheel widget itself, which ties everything together and holds the animation controller.
Let’s start with the signature of this widget:
 1class FortuneWheel<T> extends StatefulWidget {
 2  FortuneWheel({
 3    required this.controller,
 4    this.turnsPerSecond = 8,
 5    this.rotationTimeLowerBound = 2000,
 6    this.rotationTimeUpperBound = 4000,
 7    required this.children
 8  }): assert(children.length > 1, 'List with at least two elements must be given');
 9
10  final FortuneWheelController<T> controller;
11  final List<FortuneWheelChild<T>> children;
12  final int turnsPerSecond;
13  final int rotationTimeLowerBound;
14  final int rotationTimeUpperBound;
15
16  @override
17  _FortuneWheelState createState() => _FortuneWheelState();
18}
The only required parameter is the controller and the children being a list of FortuneWheelChild. All other parameters define the rather cosmetical aspects like the speed of the arrow (in turns per second) and the lower and upper bound of the amount of time it keeps on rotating during one phase.
It needs to be a StatefulWidget because inside the widget we keep track of the animation, which is a local state being managed by the widget.
Animation
We start with the animation part.
 1void _initiateAnimation() {
 2    _animationController = new AnimationController(
 3      vsync: this,
 4      lowerBound: 0,
 5      upperBound: double.infinity
 6    );
 7
 8    _animationController.addListener(() {
 9      widget.controller.setValue(
10        widget.children[
11          ((widget.children.length) * (_animationController.value % 1)).floor()
12        ]
13      );
14
15      if (_animationController.isCompleted) {
16        widget.controller.animationFinished();
17      }
18    });
19  }
We create an AnimationController with a lowerBound of zero and an upperBound of infinity. That’s because we let the animation value represent the number of turns the wheel has made. Every triggered rotation process results in an unknown number of spins because it depends on the spinning duration which is a random value between the given rotationTimeLowerBound and rotationTimeUpperBound.
We listen to the AnimationController and on every new value we inform our controller. To do this, we calculate the index in the given list of FortuneWheelChild so that it behaves as follows: if we have a list of four children, the first child should be chosen if the rotation is between 0 and 1/4. The second if it’s between 1/4 and 2/4 (equals 1/2), the third between 2/4 and 3/4 and the last between 3/4 and 4/4 (equals 1). Because the rotation value from the animation controller can be higher than 1, we first need to use the modulo operator. After that, we round the double value to the next integer by using math.floor().
Once the animation is finished, we inform the controller about that.
After having defined the part of initiating and listening to the animation, we still need the other way: listen to the controller and start the animation if necessary.
1void _initiateControllerSubscription() {
2    widget.controller.addListener(() {
3      if (!widget.controller.shouldStartAnimation || widget.controller.isAnimating)
4        return;
5
6      _startAnimation();
7    }
Pretty straight forward and self-explanatory. If the start of the animation is requested and an animation is not currently running, start a new one.
 1void _startAnimation() {
 2    widget.controller.animationStarted();
 3
 4    int milliseconds = Random().nextInt(widget.rotationTimeLowerBound) + (widget.rotationTimeUpperBound - widget.rotationTimeLowerBound);
 5    double rotateDistance = milliseconds / 1000 * widget.turnsPerSecond;
 6
 7    _animationController.value = _animationController.value % 1;
 8
 9    _animationController.duration = Duration(milliseconds: milliseconds.toInt());
10
11    _animationController.animateTo(
12      _animationController.value + rotateDistance,
13      curve: Curves.easeInOut
14    );
15  }
Starting a new animation is nothing else but determining the animation duration by generating a random value between the given boundaries. After that, reset the animation value to the current value modulo 1. That ensures that we keep the rotation where it was but cut off the spins that are higher than 1. Example: if in the previous round, the wheel rotated 7.86 amounts, it will then be 0.86.
Then we make the AnimationController animate from the current value to the newly calculated rotation distance.
That’s it. What’s left to do is to call both methods in initState() method.
Design
Before we deep dive into designing the different elements of our wheel, let’s think about it for a second – what parts do we have?
- The most important part are the slices of the whole circle. Their look is determined by the
FortuneWheelChildclass - Then there is an indicator in the center that is supposed to point at the current result and spin according to the animation
Okay then, let’s start off with drawing a single slice!
 1import 'package:flutter/material.dart';
 2import 'dart:math';
 3
 4class WheelSlicePainter extends CustomPainter {
 5  WheelSlicePainter({
 6    required this.divider,
 7    required this.number,
 8    required this.color
 9  });
10
11  final int divider;
12  final int number;
13  final Color? color;
14
15  Paint? currentPaint;
16  double angleWidth = 0;
17
18  @override
19  void paint(Canvas canvas, Size size) {
20    _initializeFill();
21    _drawSlice(canvas, size);
22  }
23
24  void _initializeFill() {
25    currentPaint = Paint()..color = color != null
26      ? color!
27      : Color.lerp(Colors.red, Colors.orange, number / (divider -1))!;
28
29    angleWidth = pi * 2 / divider;
30  }
31
32  void _drawSlice(Canvas canvas, Size size) {
33    canvas.drawArc(
34      Rect.fromCenter(
35        center: Offset(size.width / 2, size.height / 2),
36        height: size.height,
37        width: size.width,
38      ),
39      0,
40      angleWidth,
41      true,
42      currentPaint!,
43    );
44  }
45
46  @override
47  bool shouldRepaint(CustomPainter oldDelegate) => true;
48}
We use a CustomPaint class to draw our slice. If you think about it, a slice is nothing but an arc. That’s why we use the drawArc() method of the canvas class.
Important: we need to know the total amount of children (called divider here) so that we can adjust the angle of the arc. Basically we take a whole circle (pi * 2) and divide it by the amount of children to get the arc.
If no color is given, we interpolate the color (linearinterpolate method) from red to orange.
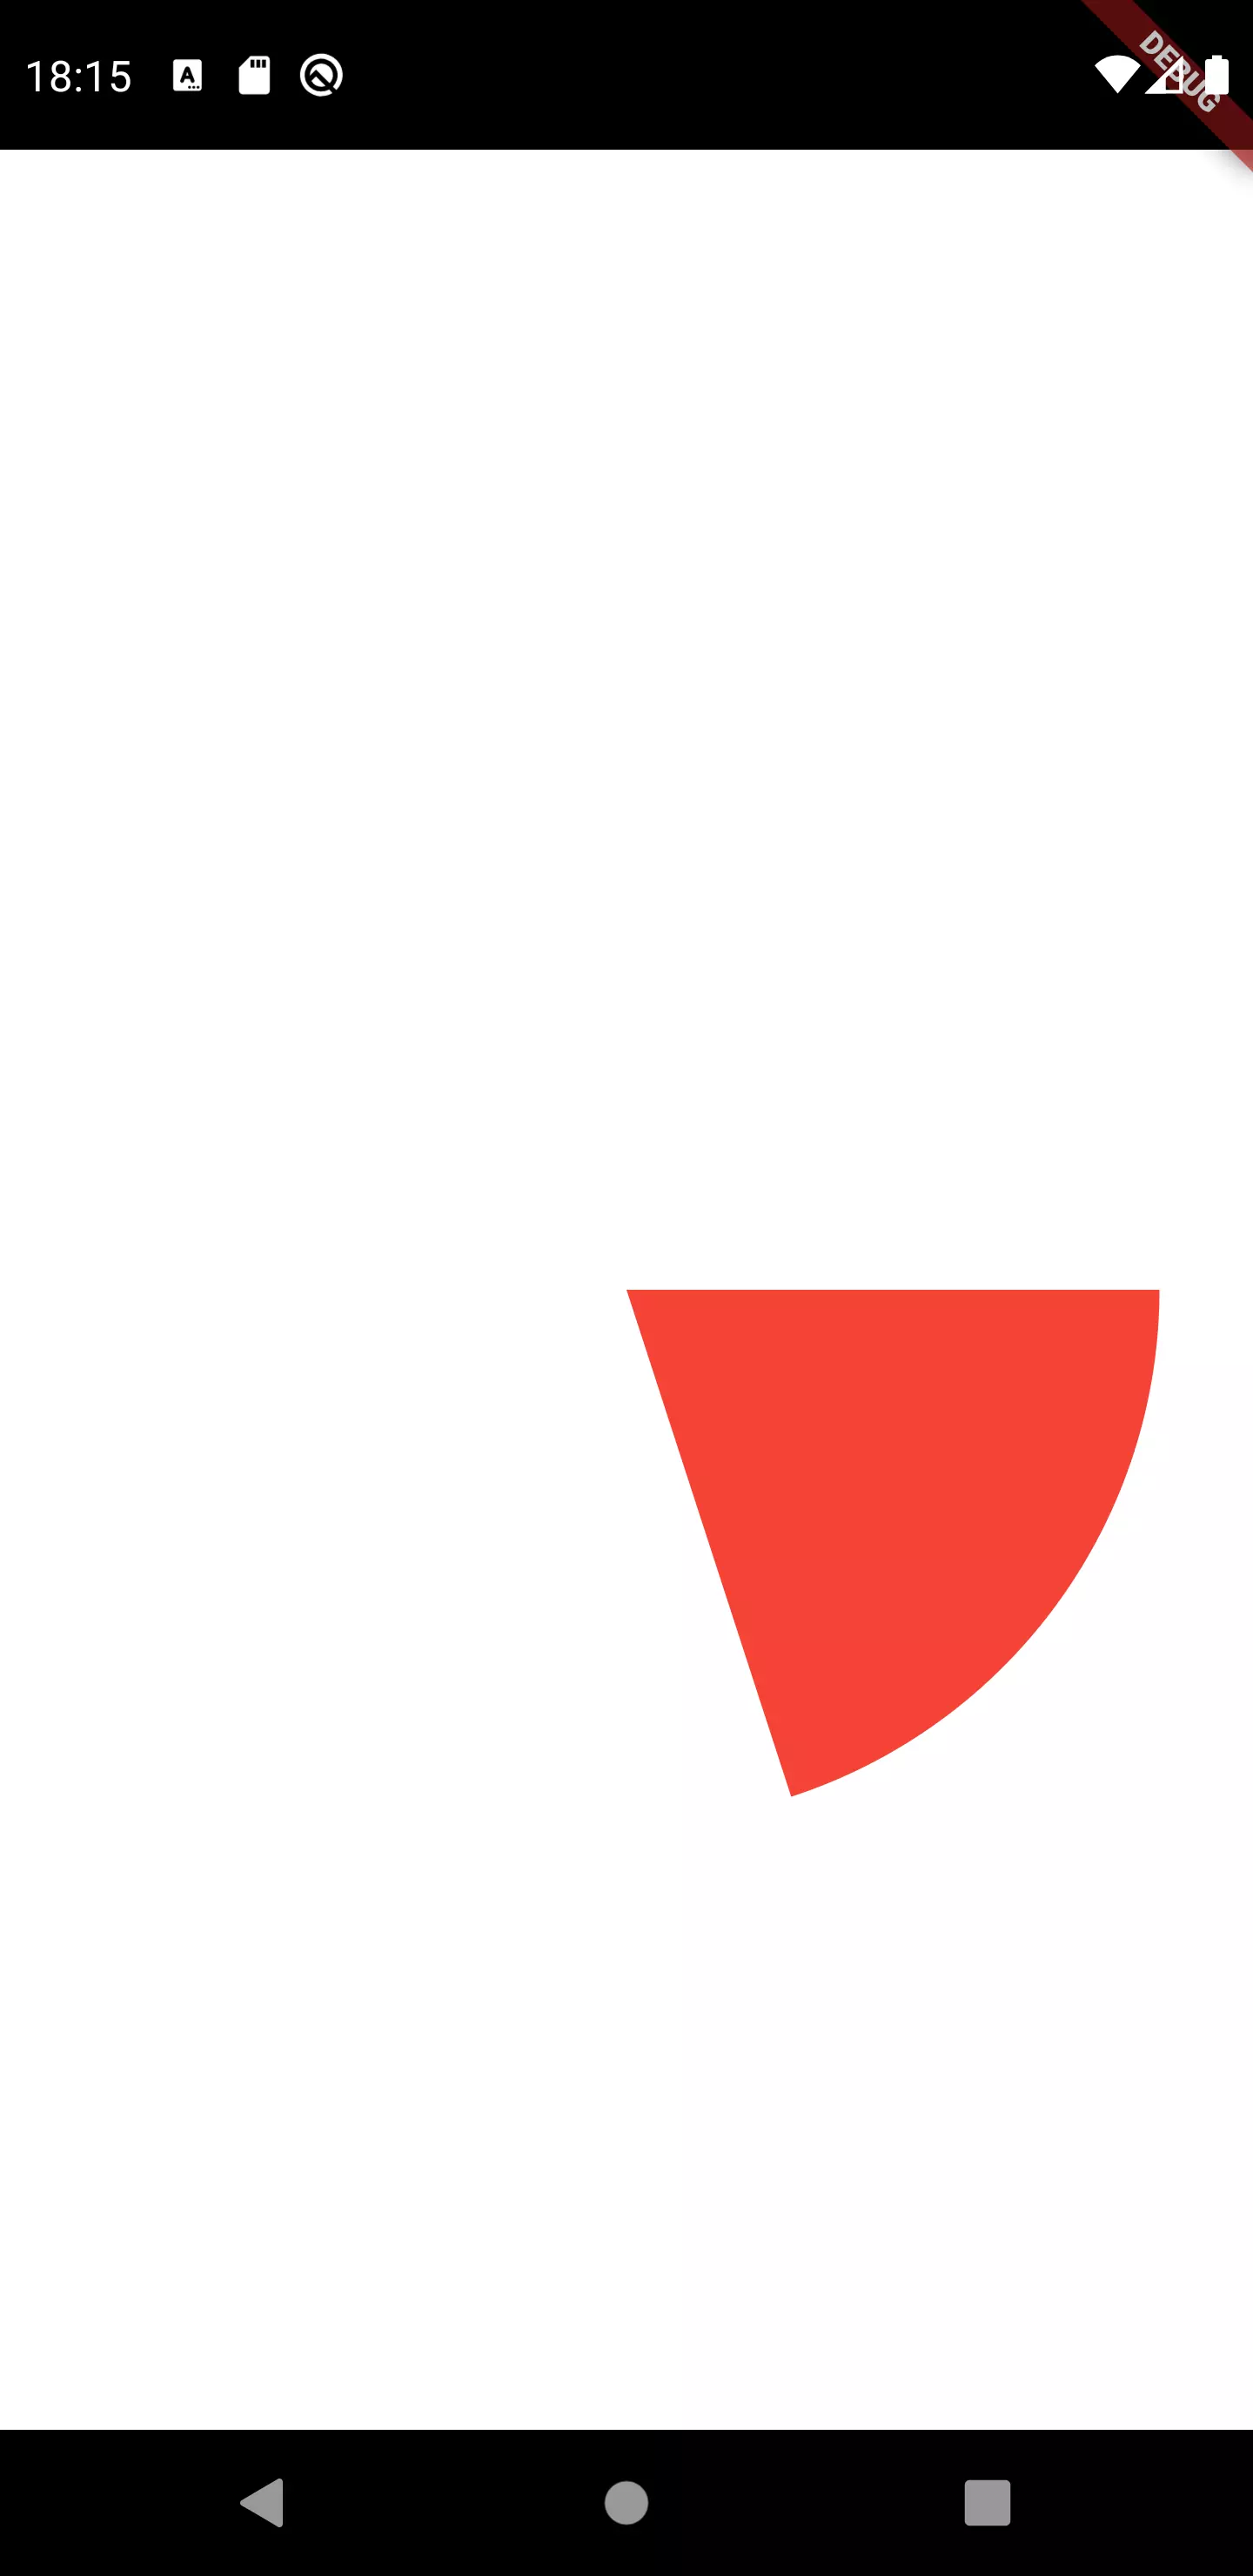
If we draw it on the screen with divider being 5 and number being 0, we get the above result. It seems like drawing an arc always starts at (0,0) if you regard the circle in the context of a cartesian coordinate system. This translates to pi / 2 or 90 °.
Now, we want the first child that is added to be the first element of the rotation and to be a the top center position of the wheel. So we need to rotate the whole wheel. But first, let’s wrap the slice in a class.
 1class WheelSlice extends StatelessWidget {
 2  WheelSlice({
 3    required this.index,
 4    required this.size,
 5    required this.fortuneWheelChildren
 6  });
 7
 8  final int index;
 9  final double size;
10  final List<FortuneWheelChild> fortuneWheelChildren;
11
12  @override
13  Widget build(BuildContext context) {
14    int childCount = fortuneWheelChildren.length;
15    double pieceAngle = (index / childCount * pi * 2);
16
17    return Stack(
18      children: [
19        _getSliceBackground(pieceAngle, childCount),
20      ],
21    );
22  }
23
24  Transform _getSliceBackground(double pieceAngle, int childCount) {
25    return Transform.rotate(
26      angle: pieceAngle,
27      alignment: Alignment.center,
28      child: Stack(
29        children: [
30          Container(
31            width: size,
32            height: size,
33            child: CustomPaint(
34              painter: WheelSlicePainter(
35                divider: childCount,
36                number: index,
37                color: fortuneWheelChildren[index].background
38              ),
39              size: Size(size, size),
40            ),
41          ),
42        ],
43      ),
44    );
45  }
46}
Our class WheelSlice expects an index, a size and a list of all FortuneWheelChild objects. We use these information to calculate an angle by which the slice should be rotated and pass it to the painter we have created before.
 1@override
 2  Widget build(BuildContext context) {
 3    return Container(
 4      child: LayoutBuilder(
 5        builder: (BuildContext context, BoxConstraints constraints) {
 6          size = min(constraints.maxHeight, constraints.maxWidth);
 7
 8          return SizedBox(
 9            width: size,
10            height: size,
11            child: _getWheelContent(),
12          );
13        }
14      ),
15    );
16  }
17
18  Stack _getWheelContent() {
19    return Stack(
20      children: [
21        _getSlices(),
22      ],
23    );
24  }
25
26  Widget _getSlices() {
27    return Stack(
28      children: [
29        for (int index = 0; index < widget.children.length; index++)
30          WheelSlice(
31          	index: index, size: size, fortuneWheelChildren: widget.children
32    	  ),
33      ],
34    );
35  }
We enhanced our FortuneWheel class with a build function. Previously we have only created the animation, but now we actually display something based on the animation value.
We prepare a Stack because there will be Widgets on top of the slices.
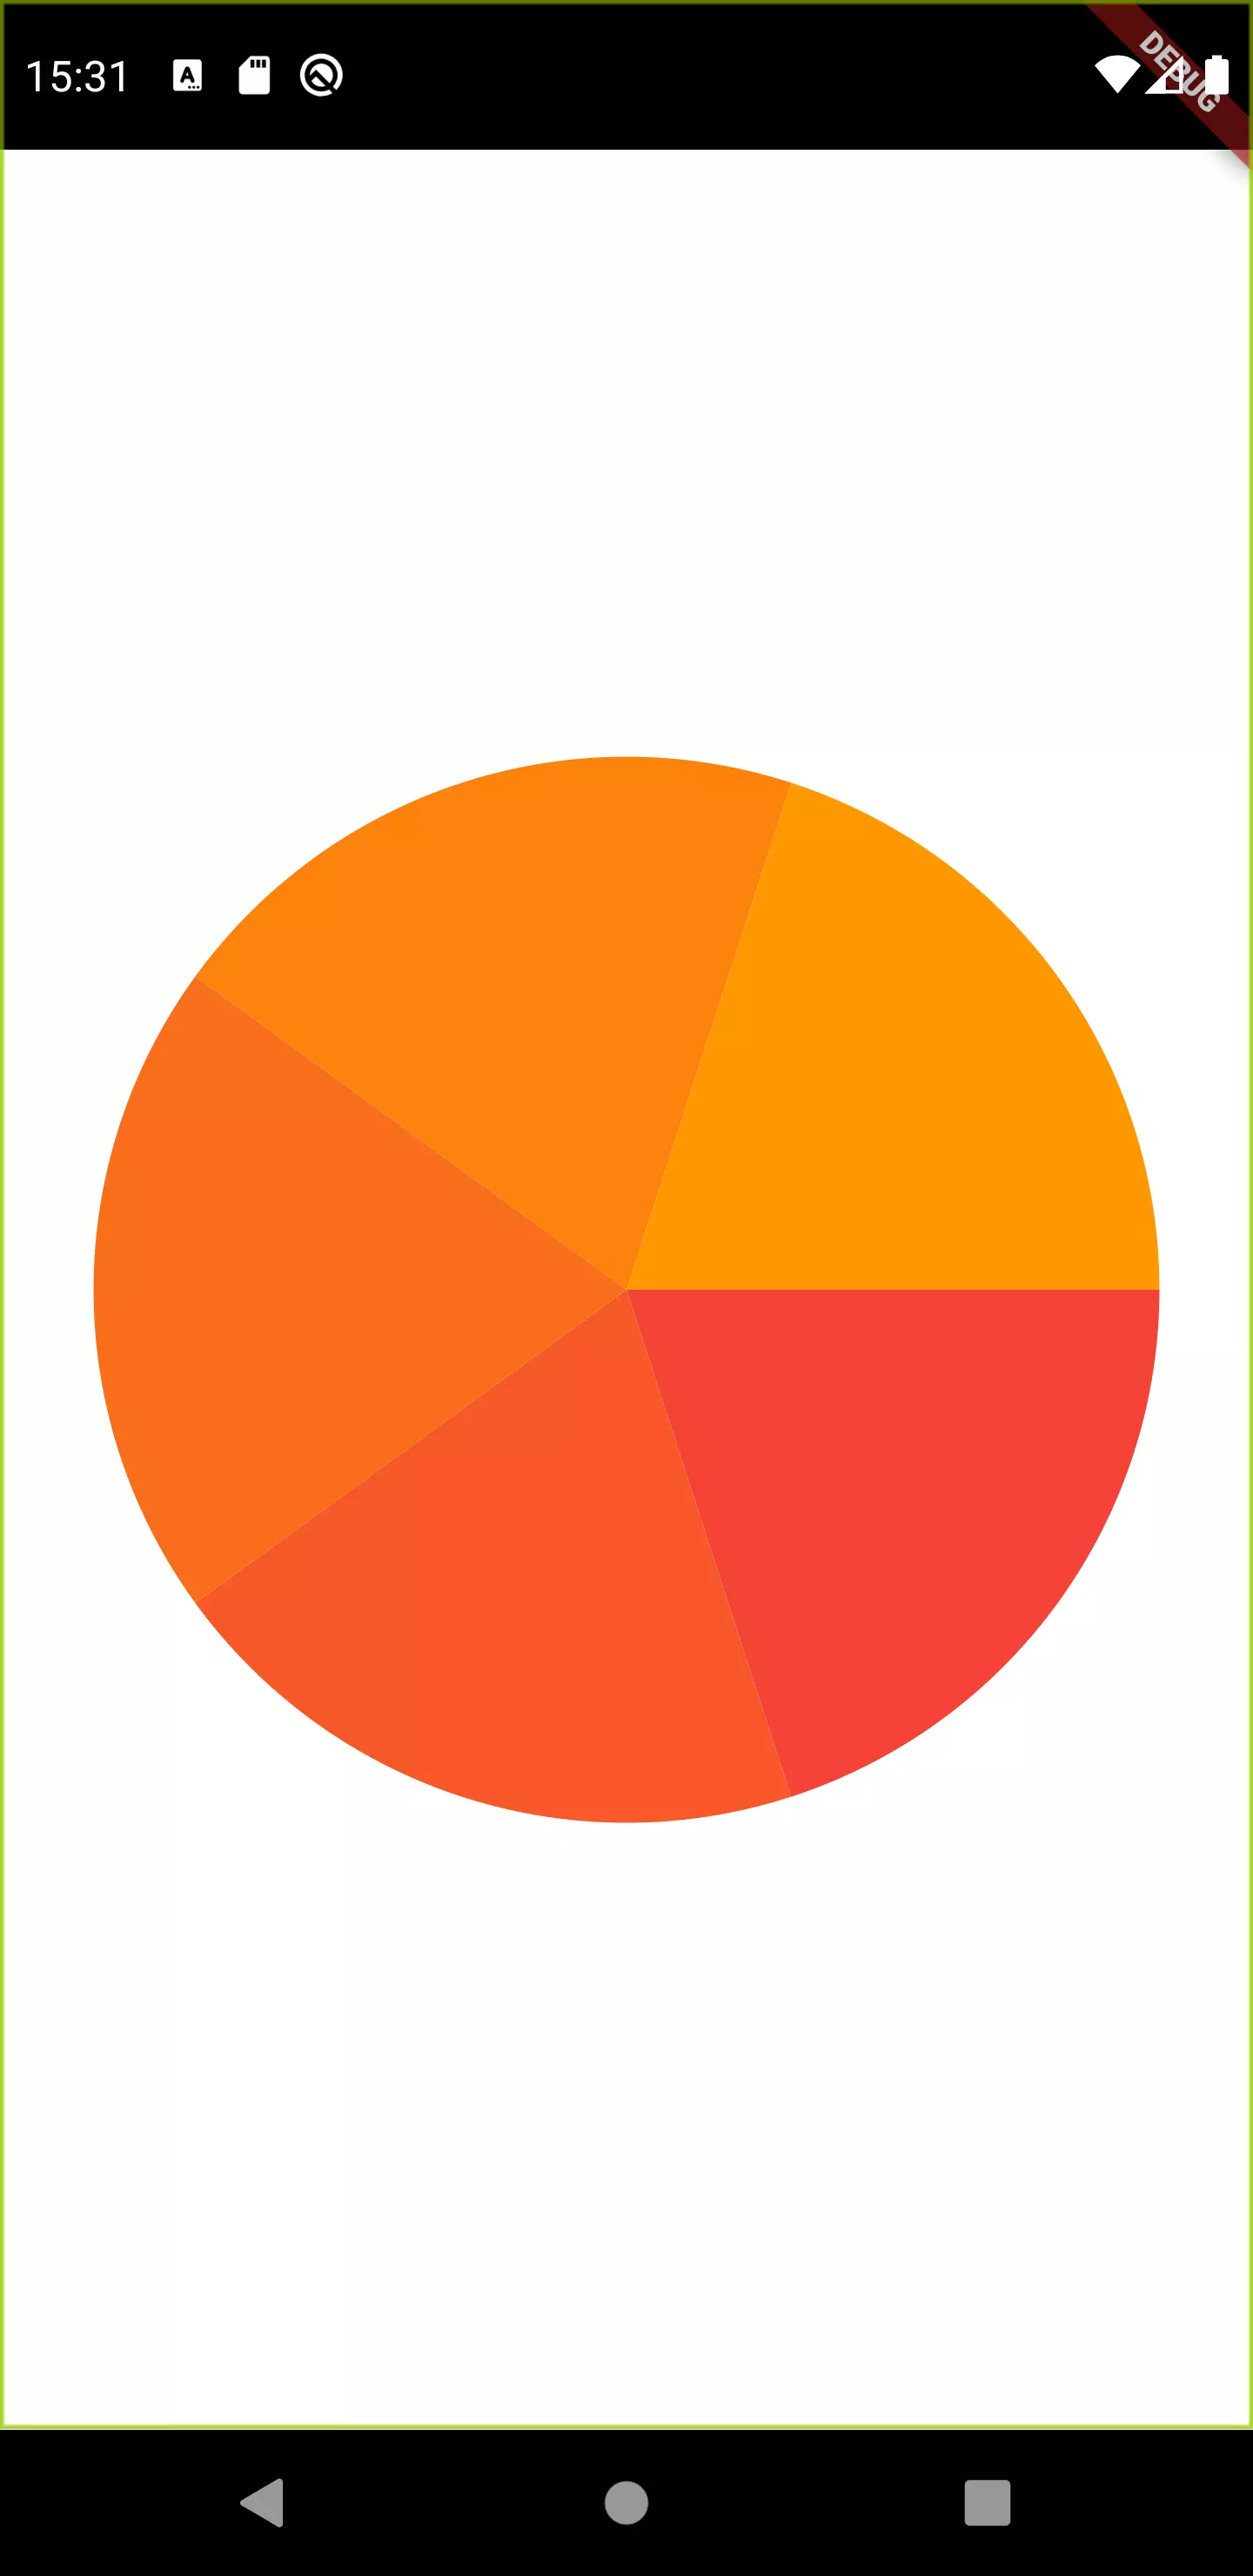
Looks like a fortune wheel. However, the rotation does not seem right. If the color interpolates from red to orange, then we would expect the red slice to be oon top. Let’s fix this by rotating the whole wheel back by a quarter of a circle.
 1Widget _getSlices() {
 2    double fourthCircleAngle = pi / 2;
 3    double pieceAngle = pi * 2 / widget.children.length;
 4
 5    return Stack(
 6      children: [
 7        for (int index = 0; index < widget.children.length; index++)
 8          Transform.rotate(
 9            angle: (-fourthCircleAngle) - (pieceAngle / 2),
10            child: WheelSlice(
11              index: index, size: size, fortuneWheelChildren: widget.children
12            ),
13          ),
14      ],
15    );
16  }
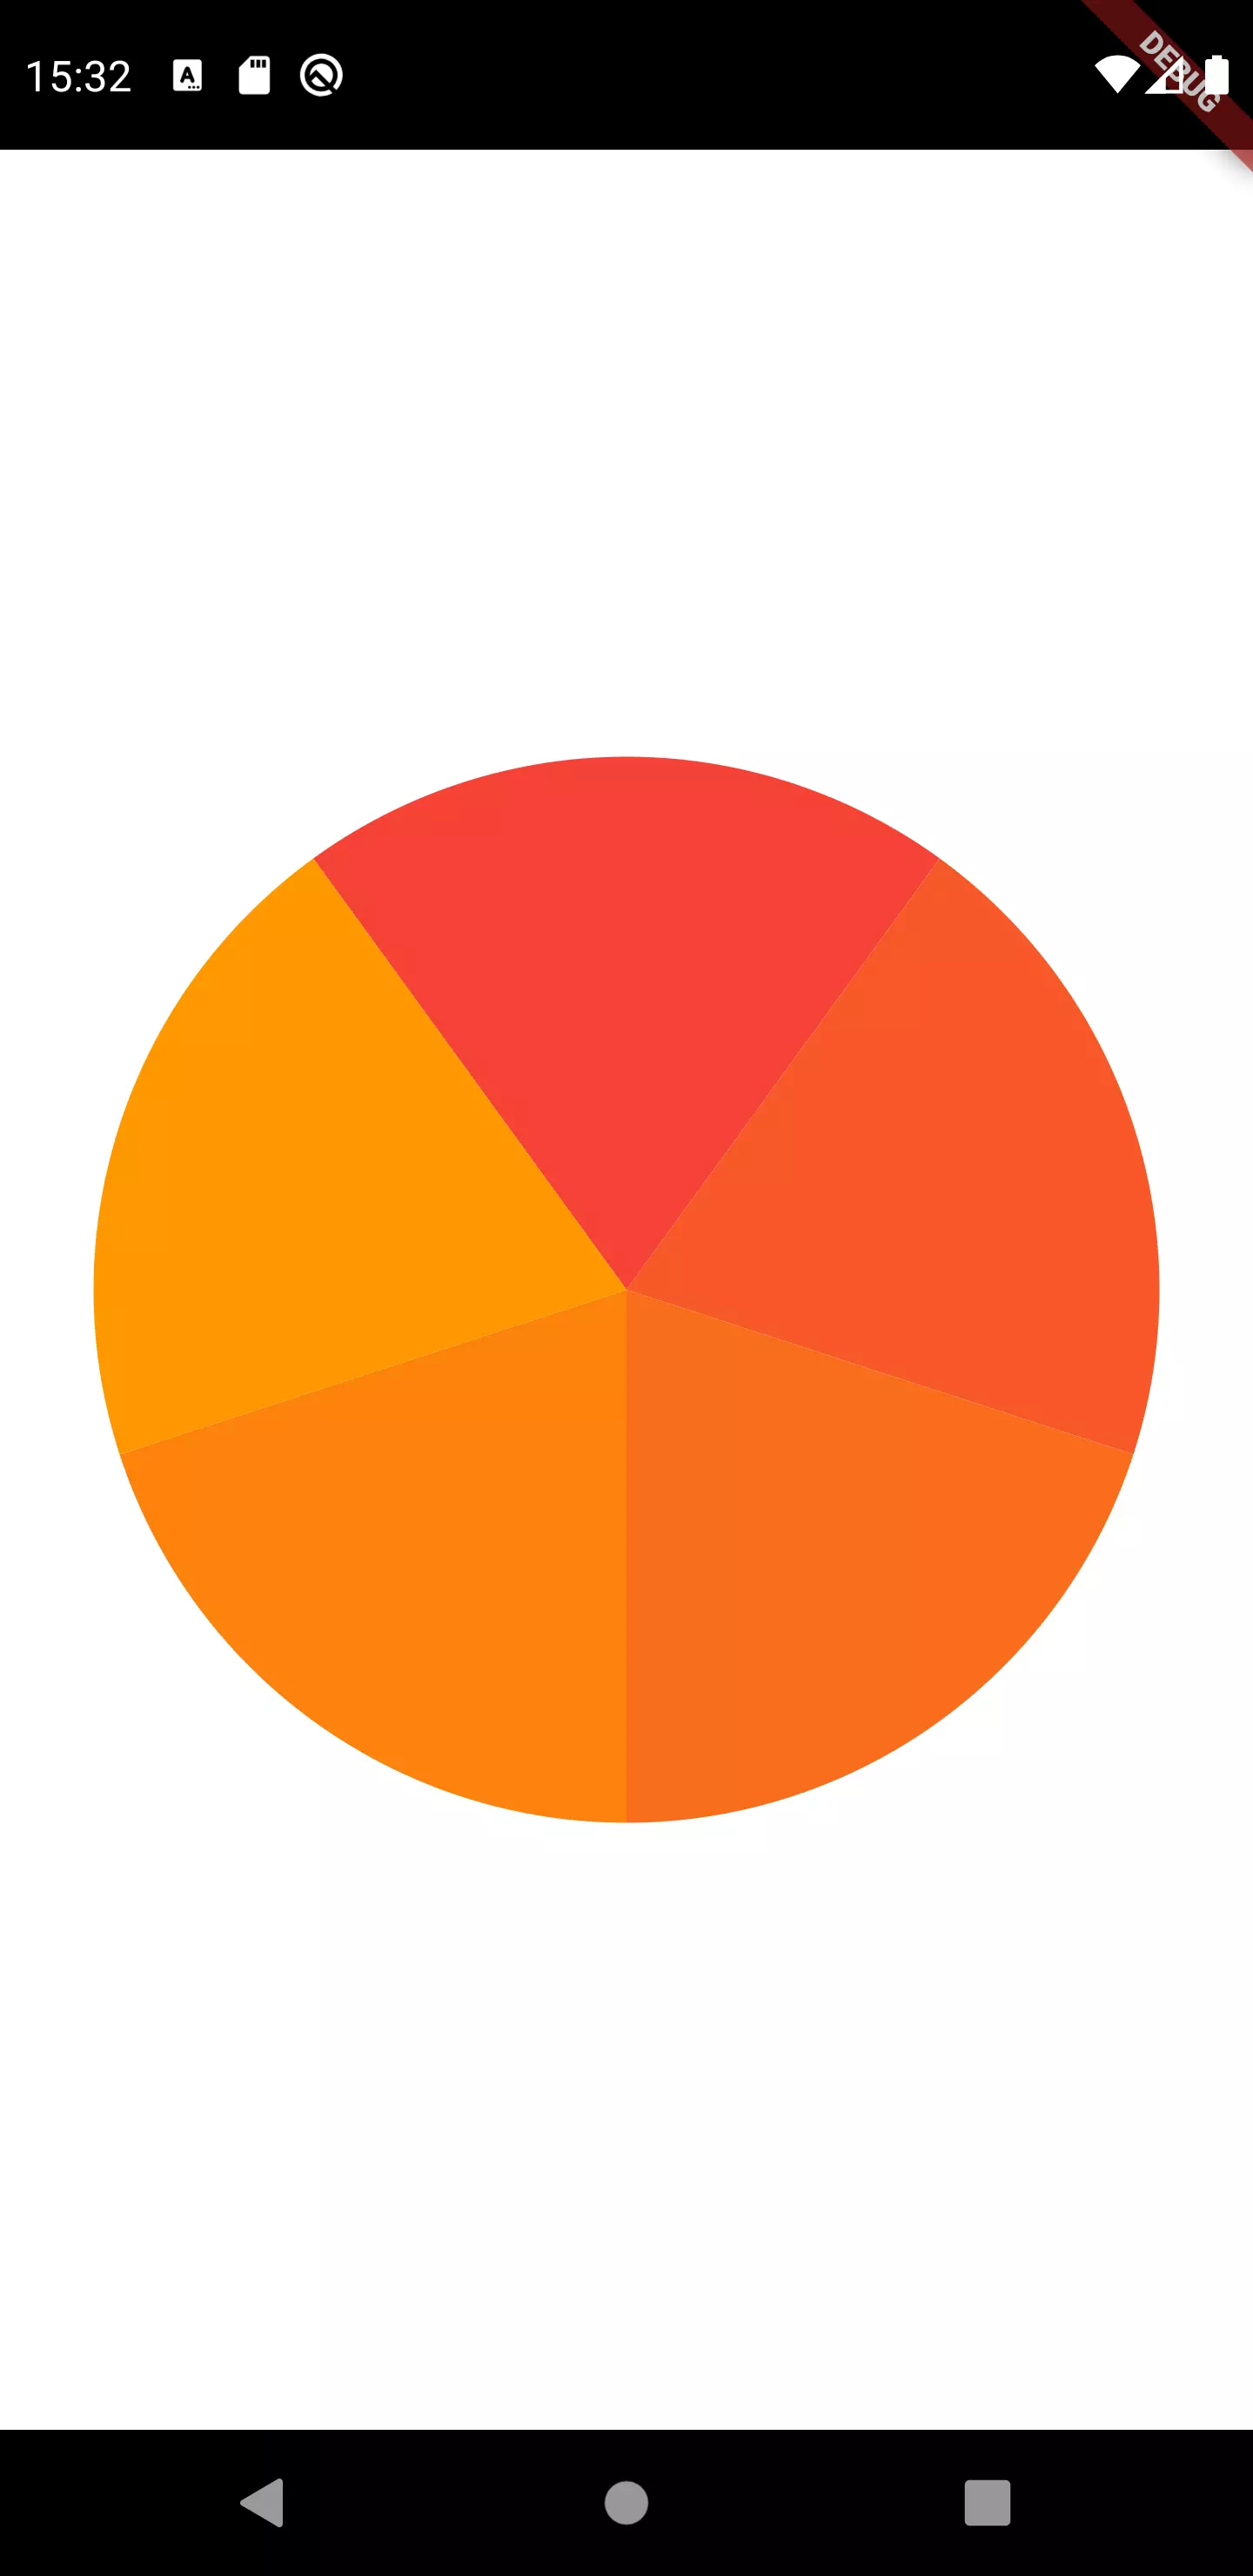
Okay, this is better. Now in addition to the background color. we want to display the foreground widget centered on top of every slice.
 1@override
 2  Widget build(BuildContext context) {
 3    int childCount = fortuneWheelChildren.length;
 4    double pieceAngle = (index / childCount * pi * 2);
 5    double pieceWidth = childCount == 2 ? size : sin(pi / childCount) * size / 2;
 6    double pieceHeight = size / 2;
 7
 8    return Stack(
 9      children: [
10        _getSliceBackground(pieceAngle, childCount),
11        _getSliceForeground(pieceAngle, pieceWidth, pieceHeight)
12      ],
13    );
14  }
15
16  Widget _getSliceForeground(double pieceAngle, double pieceWidth, double pieceHeight) {
17    double centerOffset = (pi / fortuneWheelChildren.length);
18    double leftRotationOffset = (-pi / 2);
19
20    return Transform.rotate(
21      angle: leftRotationOffset + pieceAngle + centerOffset,
22      alignment: Alignment.center,
23      child: Stack(
24        children: [
25          Positioned(
26            top: size / 2,
27            left: size / 2 - pieceWidth / 2,
28            child: Container(
29              padding: EdgeInsets.all(size / fortuneWheelChildren.length / 4),
30              height: pieceHeight,
31              width: pieceWidth,
32              child: FittedBox(
33                  fit: BoxFit.scaleDown,
34                  alignment: Alignment.center,
35                  child: Transform.rotate(
36                      angle: -pieceAngle - leftRotationOffset * 2,
37                      child: fortuneWheelChildren[index].foreground
38                  )
39              ),
40            )
41          ),
42        ],
43      ),
44    );
45  }
We can’t just use the pieceAngle to position the foreground on top of the slice. We also want it to be centered within the slice. For that, we need a rectangle that spans across our slice and put the widget in the center. The imaginary rectangle (colored green, half-transparent) looks like this:
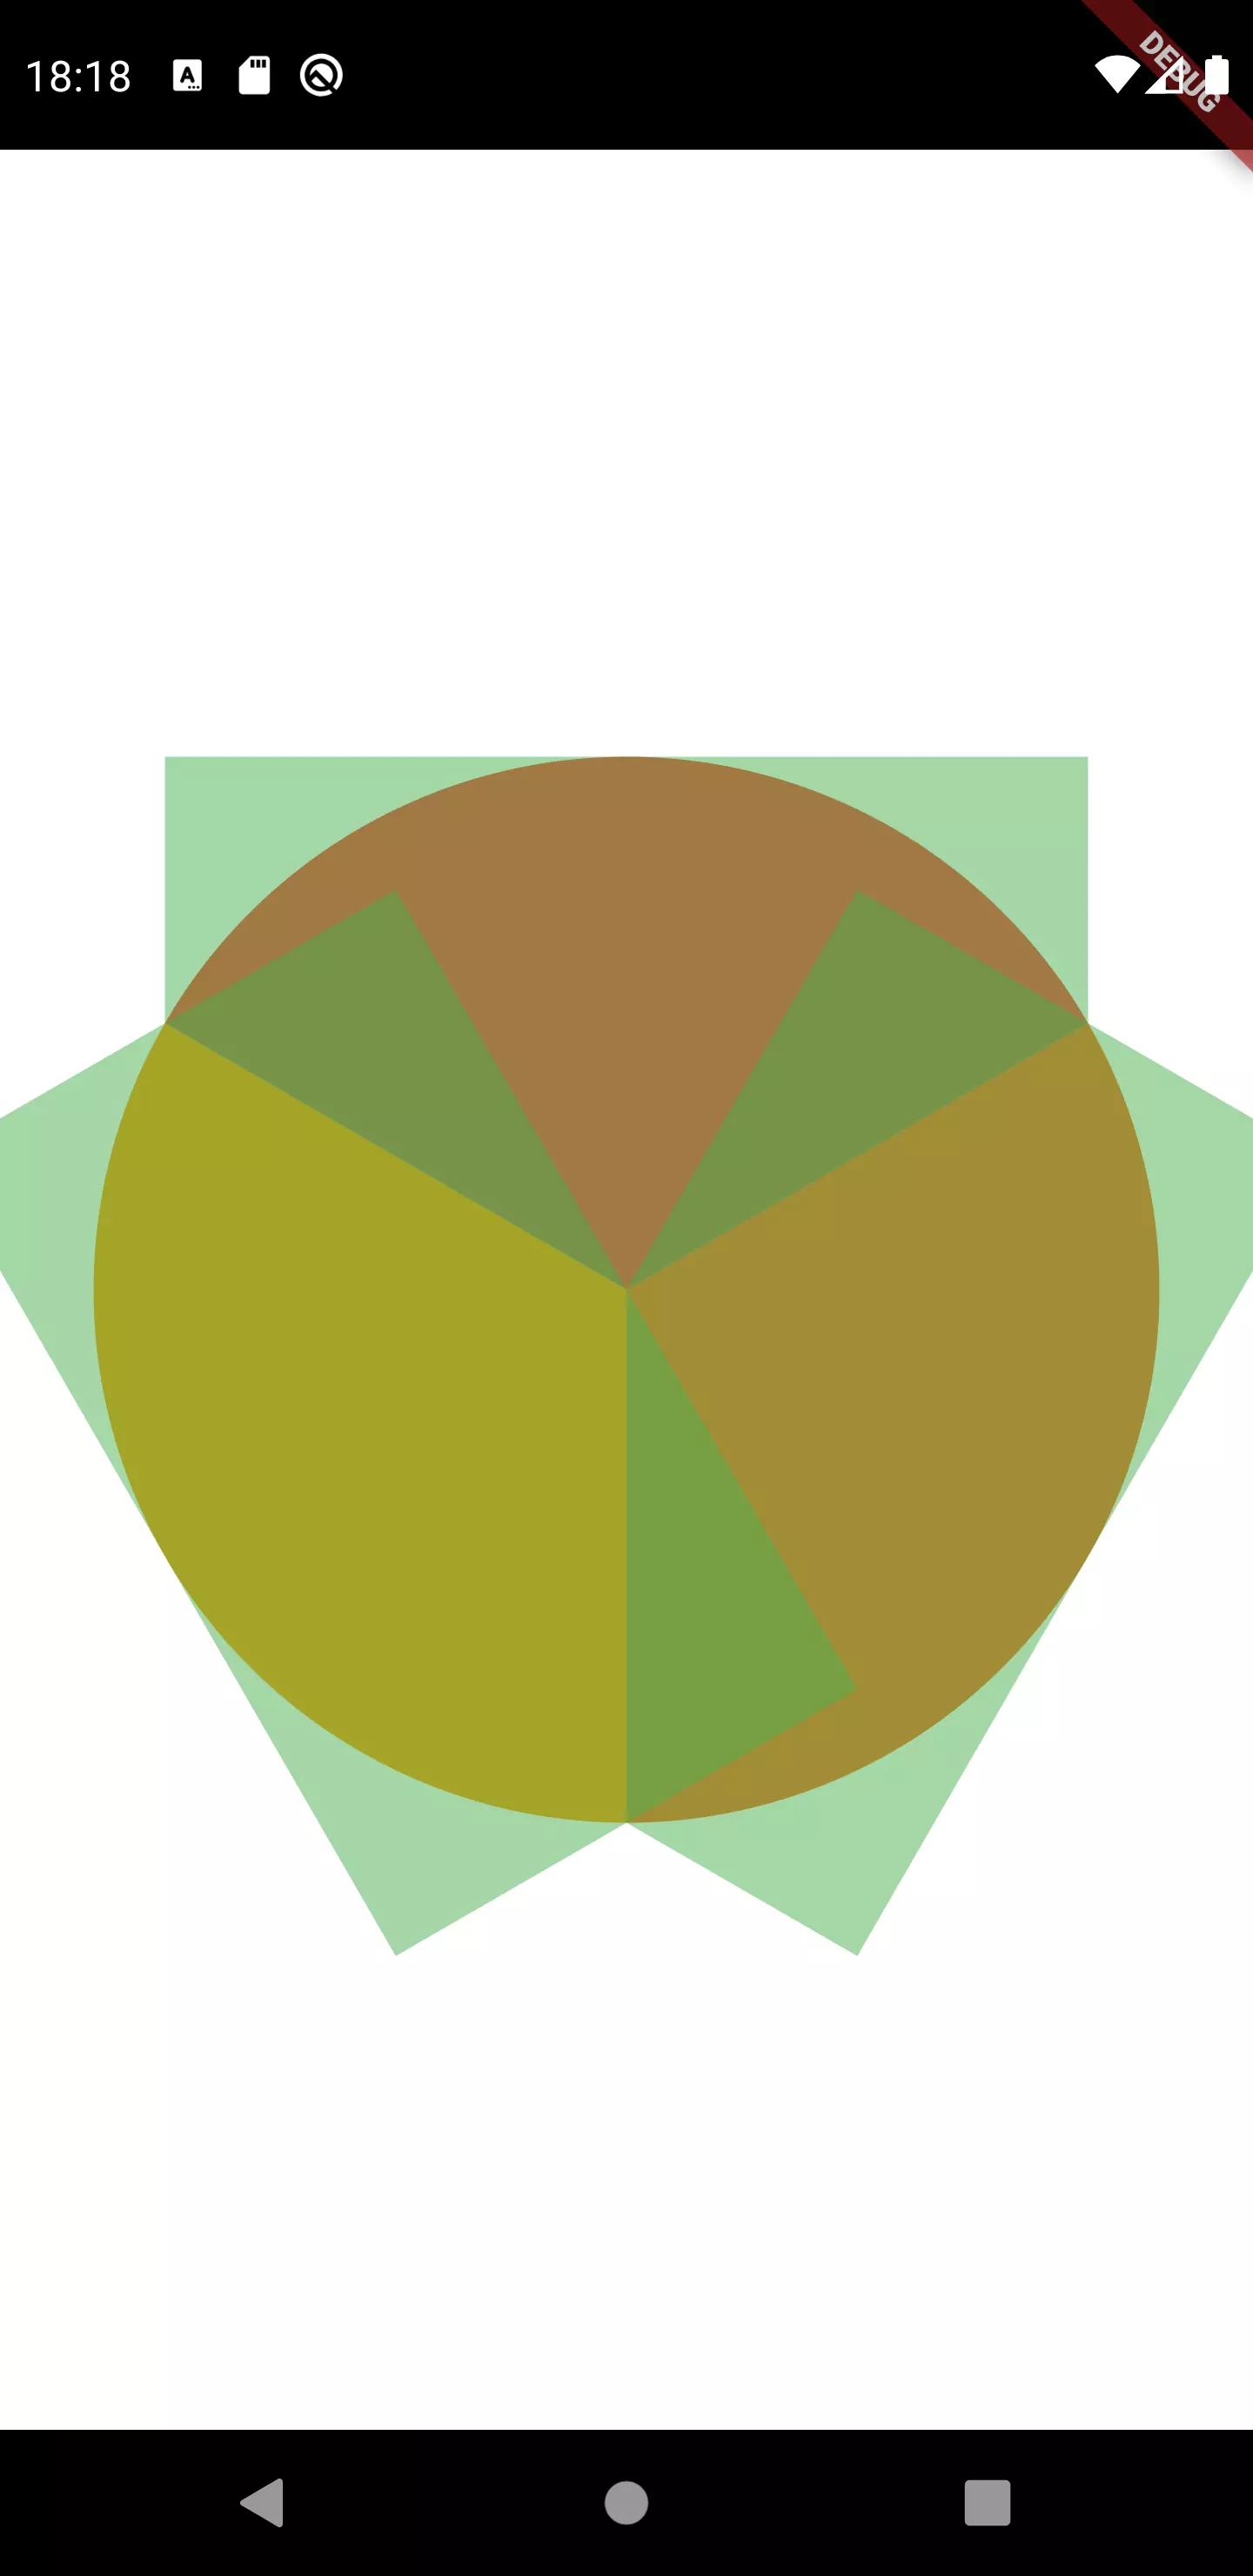
We have a known angle (360 ° divided by the amount of slices) and two sides with a known length (the radius of a circle). This enables us to calculate the missing side length with the sinus rule: sin(pi / childCount) * size / 2. If the number of children equals 2, we can not use this rule because we have no triangle. Instead, we make it size / 2 wide then.
 1SizedBox(
 2    width: 350,
 3    height: 350,
 4    child: FortuneWheel<int>(
 5      controller: fortuneWheelController,
 6      children: [
 7        FortuneWheelChild(foreground: Text('Test1'), value: 1),
 8        FortuneWheelChild(foreground: Text('Test2'), value: 2),
 9        FortuneWheelChild(foreground: Text('Test3'), value: 3),
10      ],
11    )
12)
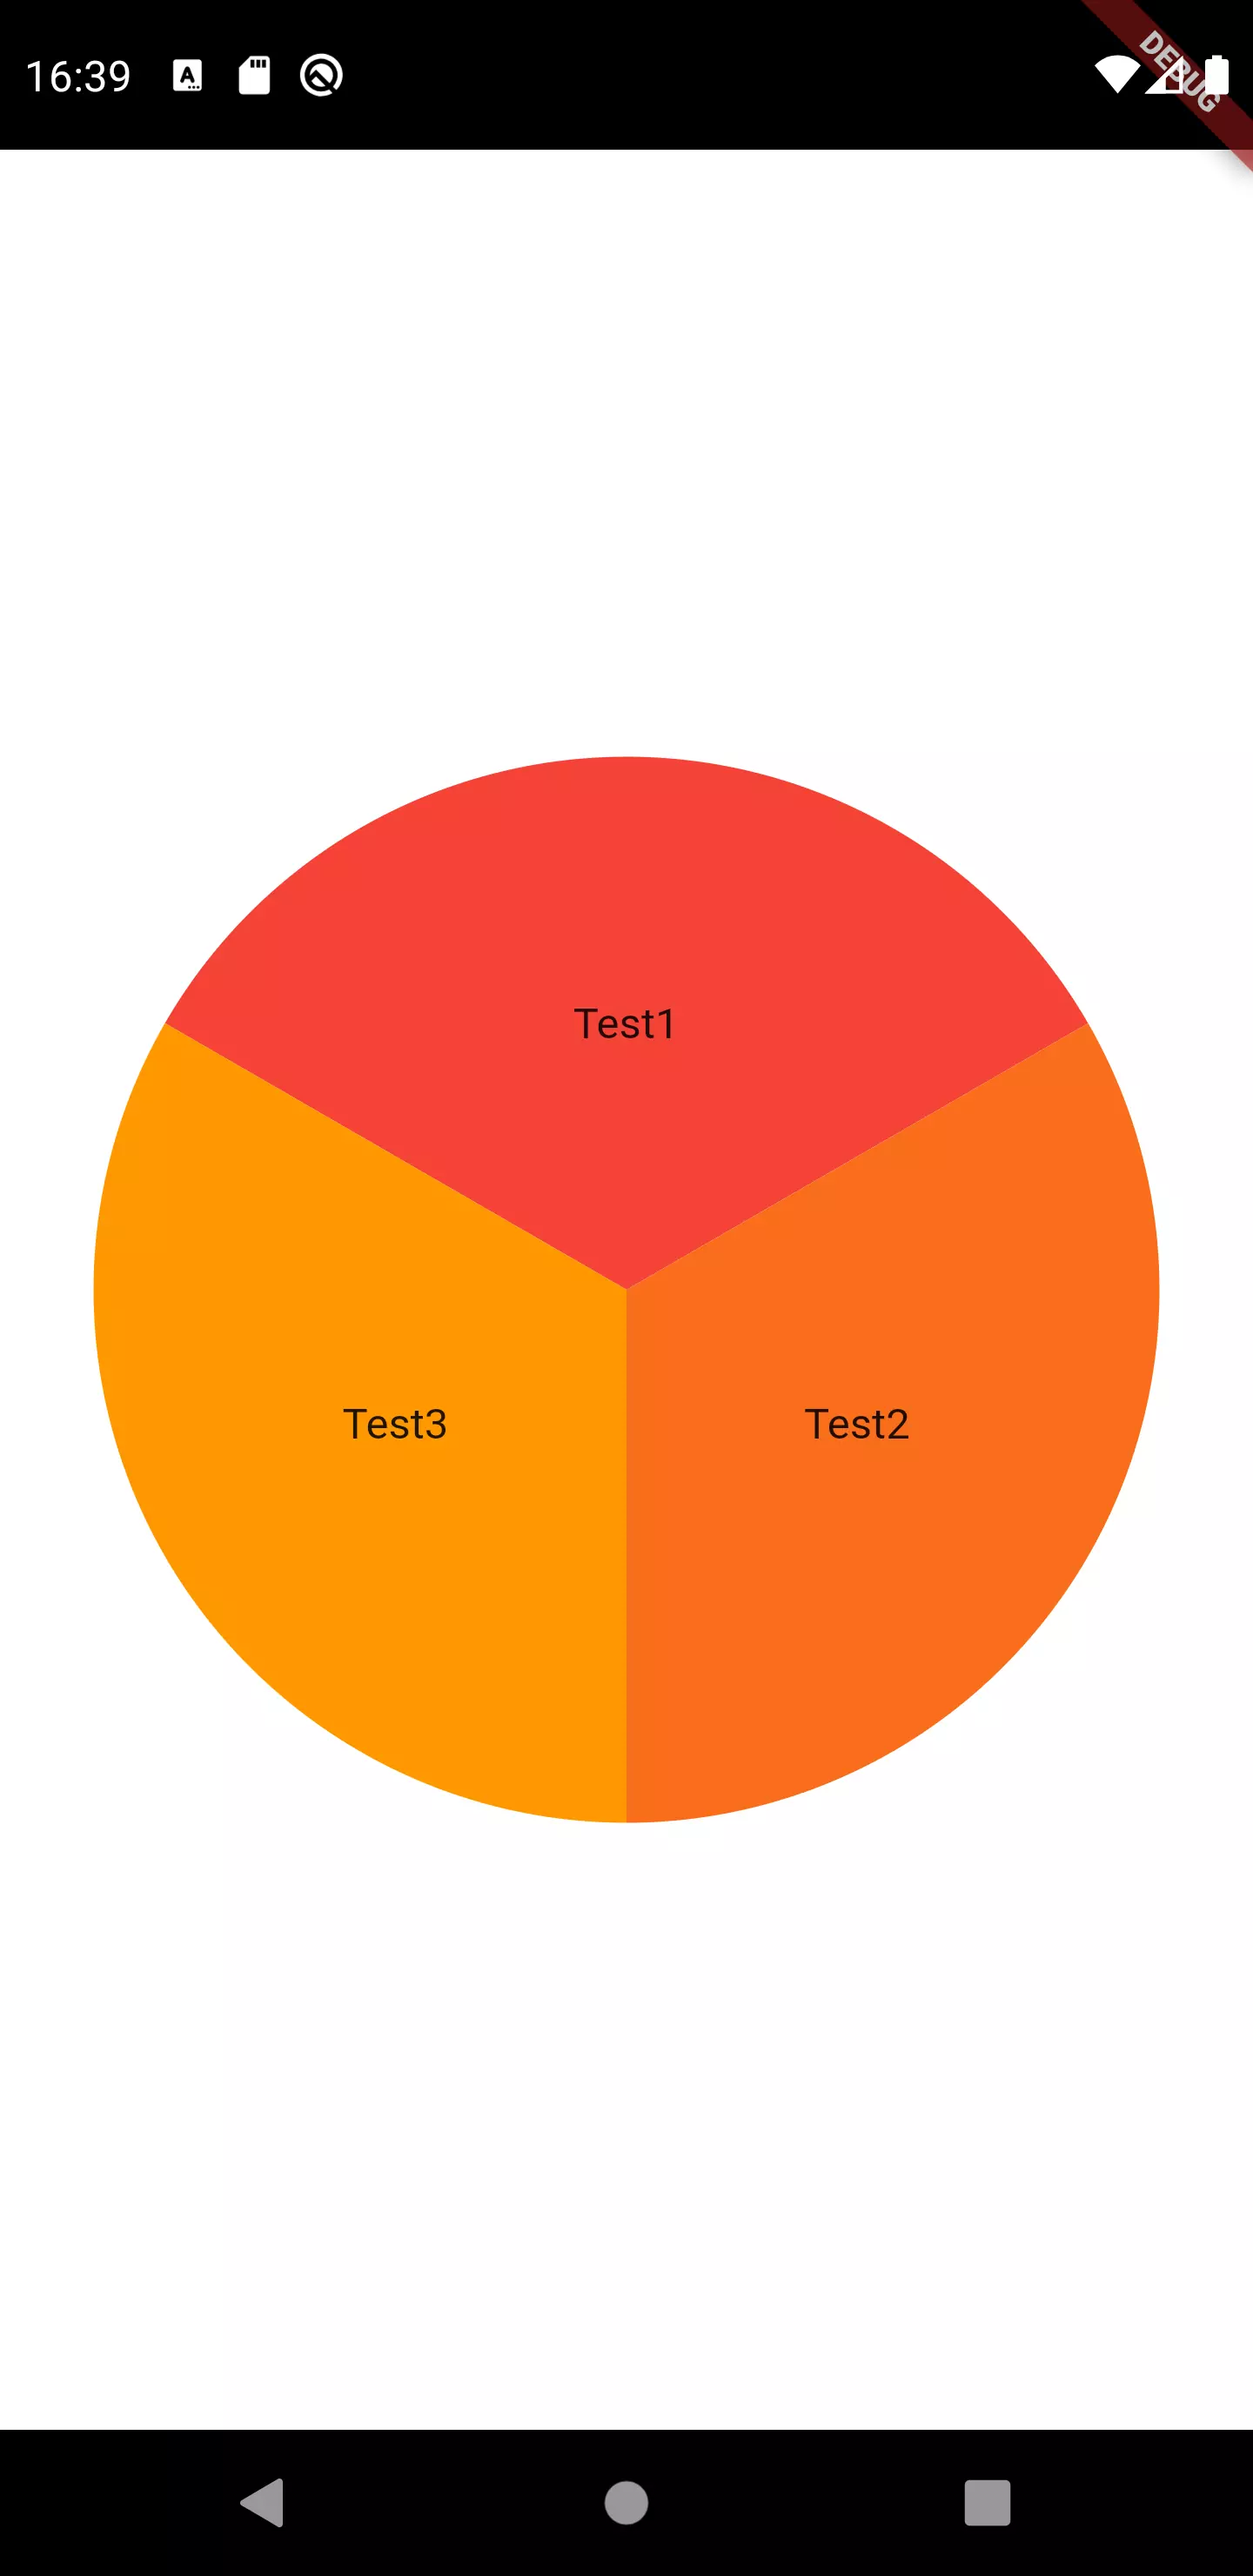
Now we need the part of the wheel that indicates the currently selected slice. For that, we place a triangle attached to a circle at the center of our wheel on top of everything.
 1class WheelResultIndicator extends StatelessWidget {
 2  WheelResultIndicator({
 3    required this.wheelSize,
 4    required this.animationController,
 5    required this.childCount
 6  });
 7
 8  final double wheelSize;
 9  final AnimationController animationController;
10  final int childCount;
11
12  @override
13  Widget build(BuildContext context) {
14
15    double indicatorSize = wheelSize / 10;
16    Color indicatorColor = Colors.black;
17
18    return Stack(
19      children: [
20        _getCenterIndicatorCircle(indicatorColor, indicatorSize),
21        _getCenterIndicatorTriangle(wheelSize, indicatorSize, indicatorColor),
22      ],
23    );
24  }
25
26  Positioned _getCenterIndicatorTriangle(double wheelSize, double indicatorSize, Color indicatorColor) {
27    return Positioned(
28      top: wheelSize / 2 - indicatorSize,
29      left: wheelSize / 2 - (indicatorSize / 2),
30      child: AnimatedBuilder(
31        builder: (BuildContext context, Widget? child) {
32          return Transform.rotate(
33            origin: Offset(0, indicatorSize / 2),
34            angle: (animationController.value * pi * 2) - (pi / (childCount)),
35            child: CustomPaint(
36              painter: TrianglePainter(
37                fillColor: indicatorColor,
38              ),
39              size: Size(indicatorSize, indicatorSize)
40            ),
41          );
42        },
43        animation: animationController,
44      ),
45    );
46  }
47
48  Center _getCenterIndicatorCircle(Color indicatorColor, double indicatorSize) {
49    return Center(
50      child: Container(
51        decoration: BoxDecoration(
52          shape: BoxShape.circle,
53          color: indicatorColor,
54        ),
55        width: indicatorSize,
56        height: indicatorSize,
57      )
58    );
59  }
60}
As there is no built-in widget that resembles a triangle, we use the CustomPaint widget to draw some. The indicator has the size of a tenth of the whole widget size. To keep it simple, we draw the circle as a usual container in the widget tree with a circle shape.
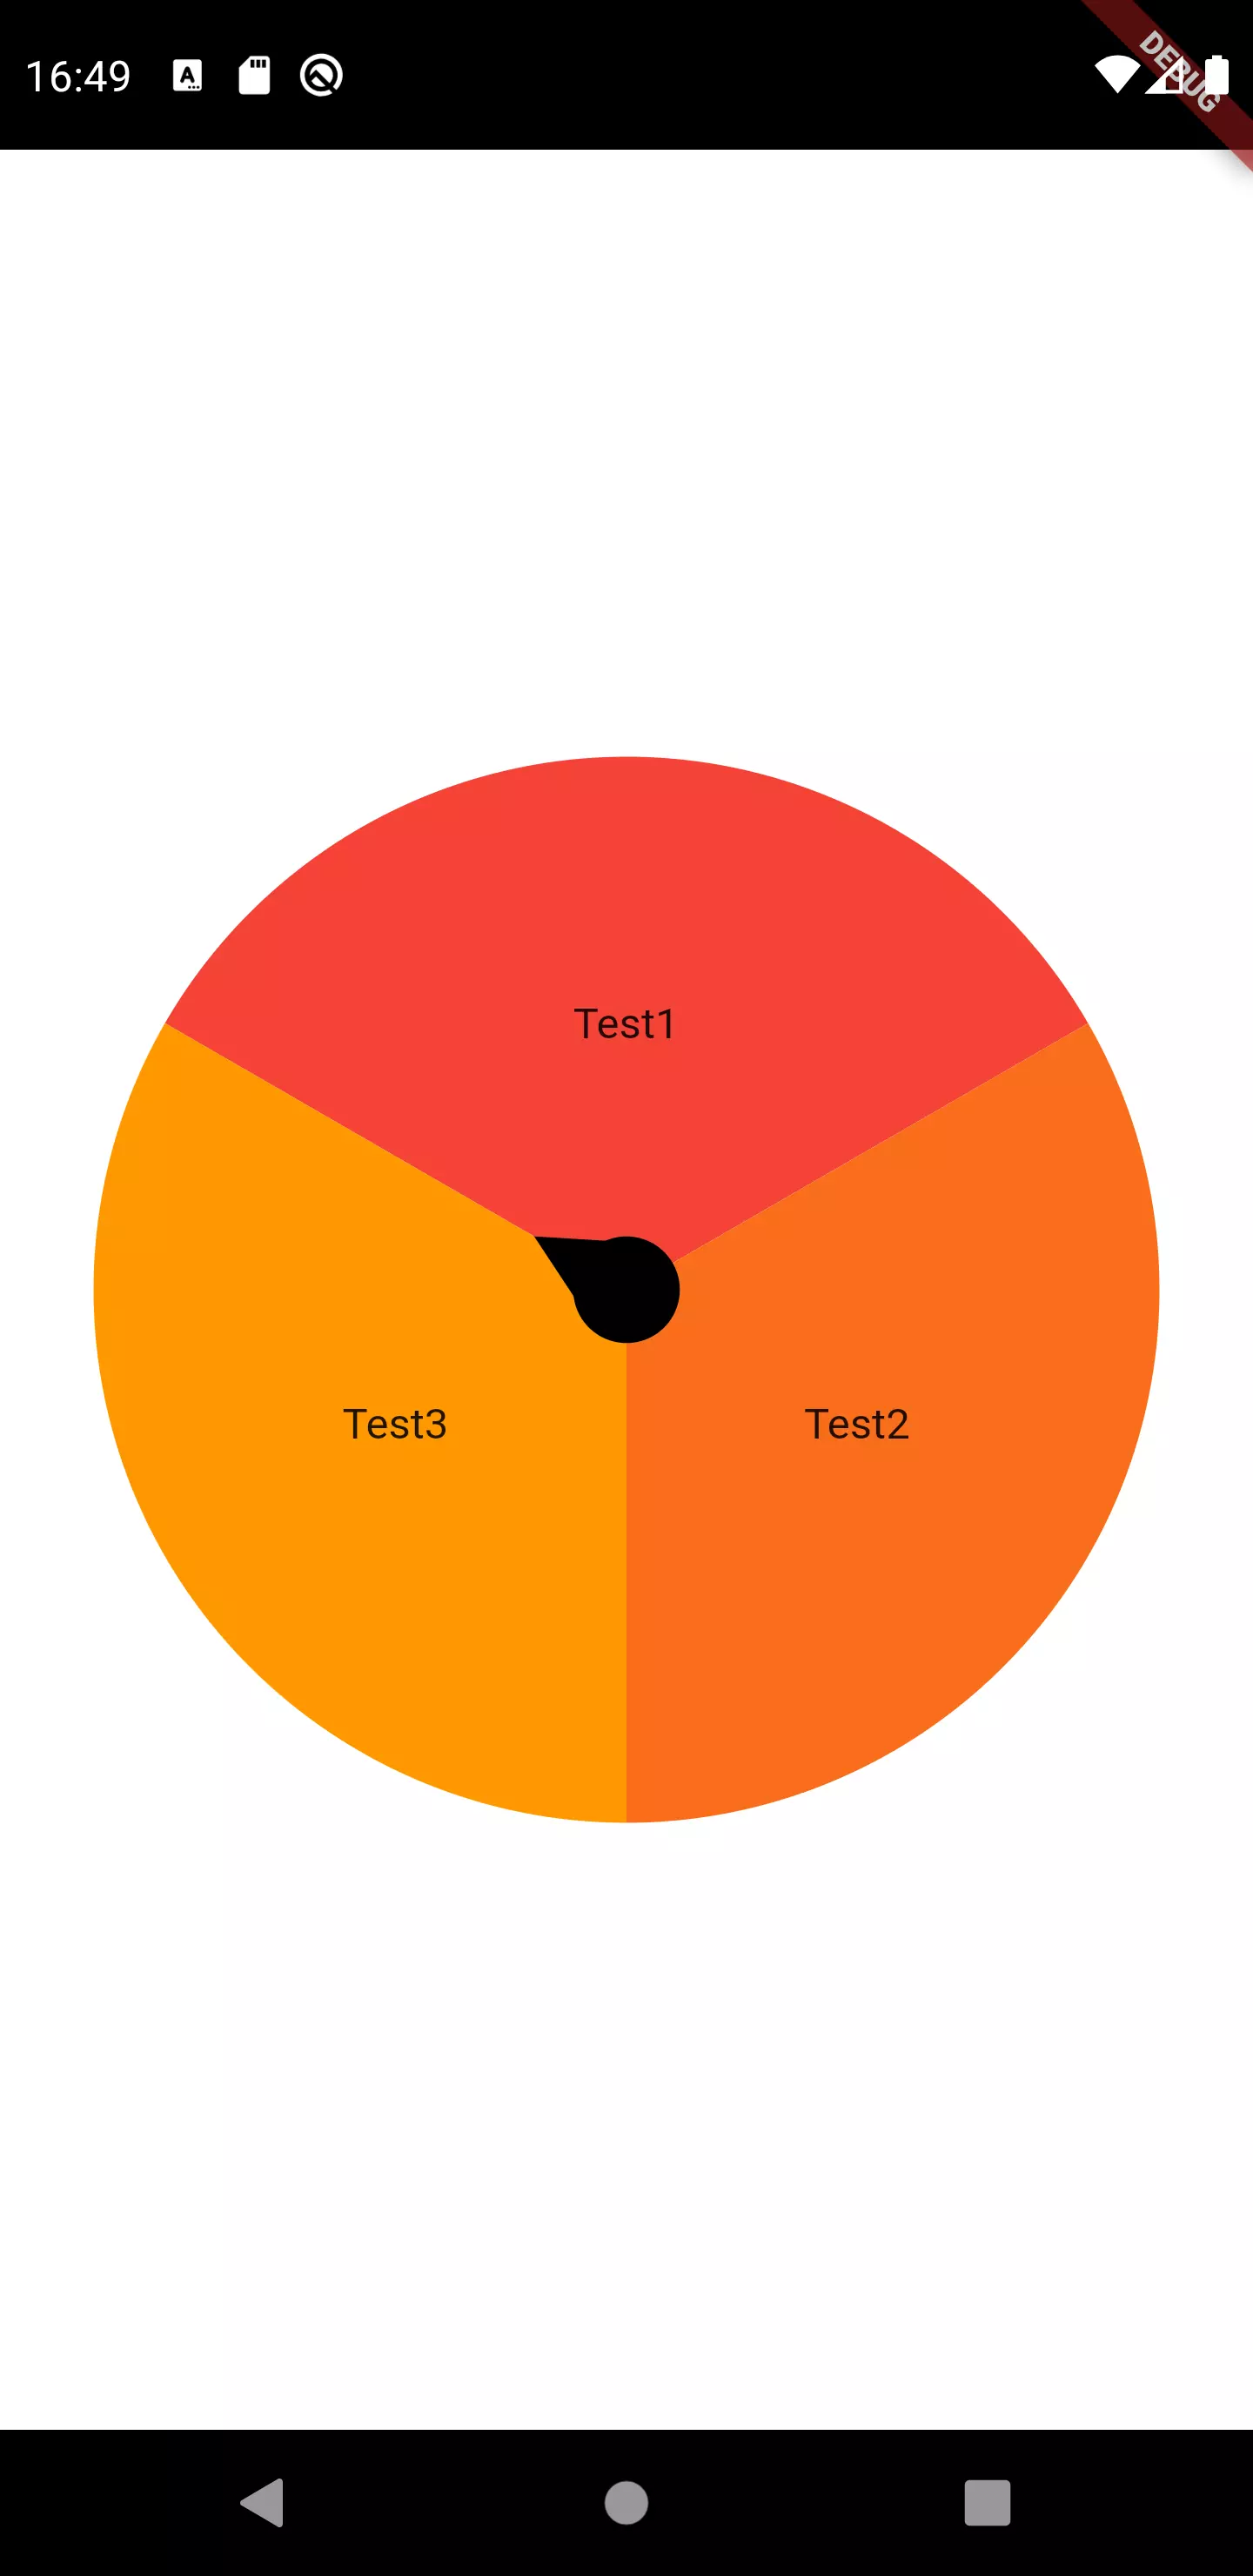
Okay, we still have some problem: the arrow indicator is pointing towards the beginning of the first slice. While this is technically correct, I think it’s more aesthetic if it starts at the top center. That’s why we have to reset the animation value initially to half of one child:
1void _initiateAnimation() {
2    _animationController = new AnimationController(
3      vsync: this,
4      lowerBound: 0,
5      upperBound: double.infinity
6    );
7
8    _animationController.value =  (0.5 / (widget.children.length));
9  ...
Usage
Now that we have designed the widget to be fully configurable and usable from the outside, let’s look at a sample usage:
  1import 'package:flutter/material.dart';
  2
  3import 'widgets/fortune_wheel.dart';
  4
  5class DemoScreen extends StatefulWidget {
  6  @override
  7  _DemoScreenState createState() => _DemoScreenState();
  8}
  9
 10class _DemoScreenState extends State<DemoScreen> {
 11  FortuneWheelController<int> fortuneWheelController = FortuneWheelController();
 12  FortuneWheelChild? currentWheelChild;
 13  int currentBalance = 0;
 14
 15  @override
 16  void initState() {
 17    fortuneWheelController.addListener(() {
 18      if (fortuneWheelController.value == null)
 19        return;
 20
 21      setState(() {
 22        currentWheelChild = fortuneWheelController.value;
 23      });
 24
 25      if (fortuneWheelController.isAnimating)
 26        return;
 27
 28      if (fortuneWheelController.shouldStartAnimation)
 29        return;
 30
 31      setState(() {
 32        currentBalance += fortuneWheelController.value!.value;
 33      });
 34    });
 35    super.initState();
 36  }
 37
 38  @override
 39  Widget build(BuildContext context) {
 40    return SafeArea(
 41      child: Scaffold(
 42        body: Container(
 43          color: Colors.white,
 44          child: Center(
 45            child: Column(
 46              mainAxisSize: MainAxisSize.min,
 47              children: [
 48                Container(
 49                  padding: EdgeInsets.all(24),
 50                  decoration: BoxDecoration(
 51                      color: currentBalance.isNegative ? Colors.red : Colors.green,
 52                      borderRadius: BorderRadius.circular(16)
 53                  ),
 54                  child: Text(
 55                    'Current balance: $currentBalance €',
 56                    style: TextStyle(
 57                        fontWeight: FontWeight.bold,
 58                        color: Colors.white,
 59                        fontSize: 18
 60                    ),
 61                  ),
 62                ),
 63                SizedBox(height: 24,),
 64                Divider(color: Colors.black87,),
 65                SizedBox(height: 16,),
 66                Container(
 67                  height: 80,
 68                  width: 80,
 69                  child: currentWheelChild != null ? currentWheelChild!.foreground : Container(),
 70                ),
 71                SizedBox(height: 16,),
 72                SizedBox(
 73                    width: 350,
 74                    height: 350,
 75                    child: FortuneWheel<int>(
 76                      controller: fortuneWheelController,
 77                      children: [
 78                        FortuneWheelChild(
 79                            foreground: Text('Test 1'),
 80                            value: 1
 81                        ),
 82                        FortuneWheelChild(
 83                            foreground: Text('Test 2'),
 84                            value: 2
 85                        ),
 86                        FortuneWheelChild(
 87                            foreground: Text('Test 3'),
 88                            value: 3
 89                        ),
 90                      ],
 91                    )
 92                ),
 93                SizedBox(height: 24),
 94                ElevatedButton(
 95                    onPressed: () => fortuneWheelController.rotateTheWheel(),
 96                    child: Padding(
 97                      padding: EdgeInsets.all(16),
 98                      child: Text('ROTATE', style: TextStyle(fontWeight: FontWeight.bold),),
 99                    )
100                )
101              ],
102            ),
103          ),
104        ),
105      ),
106    );
107  }
108}
We just listen to the FortuneWheelController in the initState() method of our widget. Whenever the value changes and is not null, we store it in a member variable. If isAnimating is false and shouldStartAnimation is false as well (meaning that the value has been revealed and animation ended), then we add the current value to the sum we have previously initiated.
We also display the currently selected value above the wheel, as the controller exposes that.

Final thoughts
By having used the method that was described in the custom controller tutorial, we were able to quickly create a fortune wheel that exposes its state to the outside and animates making its choice.


Comment this 🤌