I have recently taken a ride with a train. I had a closer look at the LED display that shows the current station, the destination and the current time. It made me wonder if it’s possible to simulate that in Flutter. Let’s find out!
The goal

The simulated LED display should display text dynamically. We don’t want to create our own LED font in which the “LED combination” of every letter is statically stored. We want an LED display that can display every text with every font.
So let’s implement a screen that has a TextField in which the user can input text. Above that we display the very same text on a simulated LED display.
Theory
What we are doing here, is a classic rasterisation. So basically something you see every day millions of times, whether you know it or not. That’s because every display is based on pixels. No matter how good the resolution of an image is and even if it’s a vector image, at the time of being displayed, the image needs to be mapped on a discrete dimension that is limited by physics. That doesn’t only happen to images, of course, but also to text. Today’s displays have such a high resolution that the viewer does not really notice that. Anti-aliasing also makes it appear so smooth that pixels don’t come to one’s mind.
But how can we access the pixels of a widget in Flutter? Well that’s not that easy, because this is a rather low-level part of the rendering engine the developer is not supposed to access. So there are no APIs that let us access that.
So we need to think of another way. Instead of directly accessing the pixels of a rendered widget, we should rather take note of the Image package. This package has a getPixelSafe() method, allowing the caller to access a pixel given the x and y arguments.
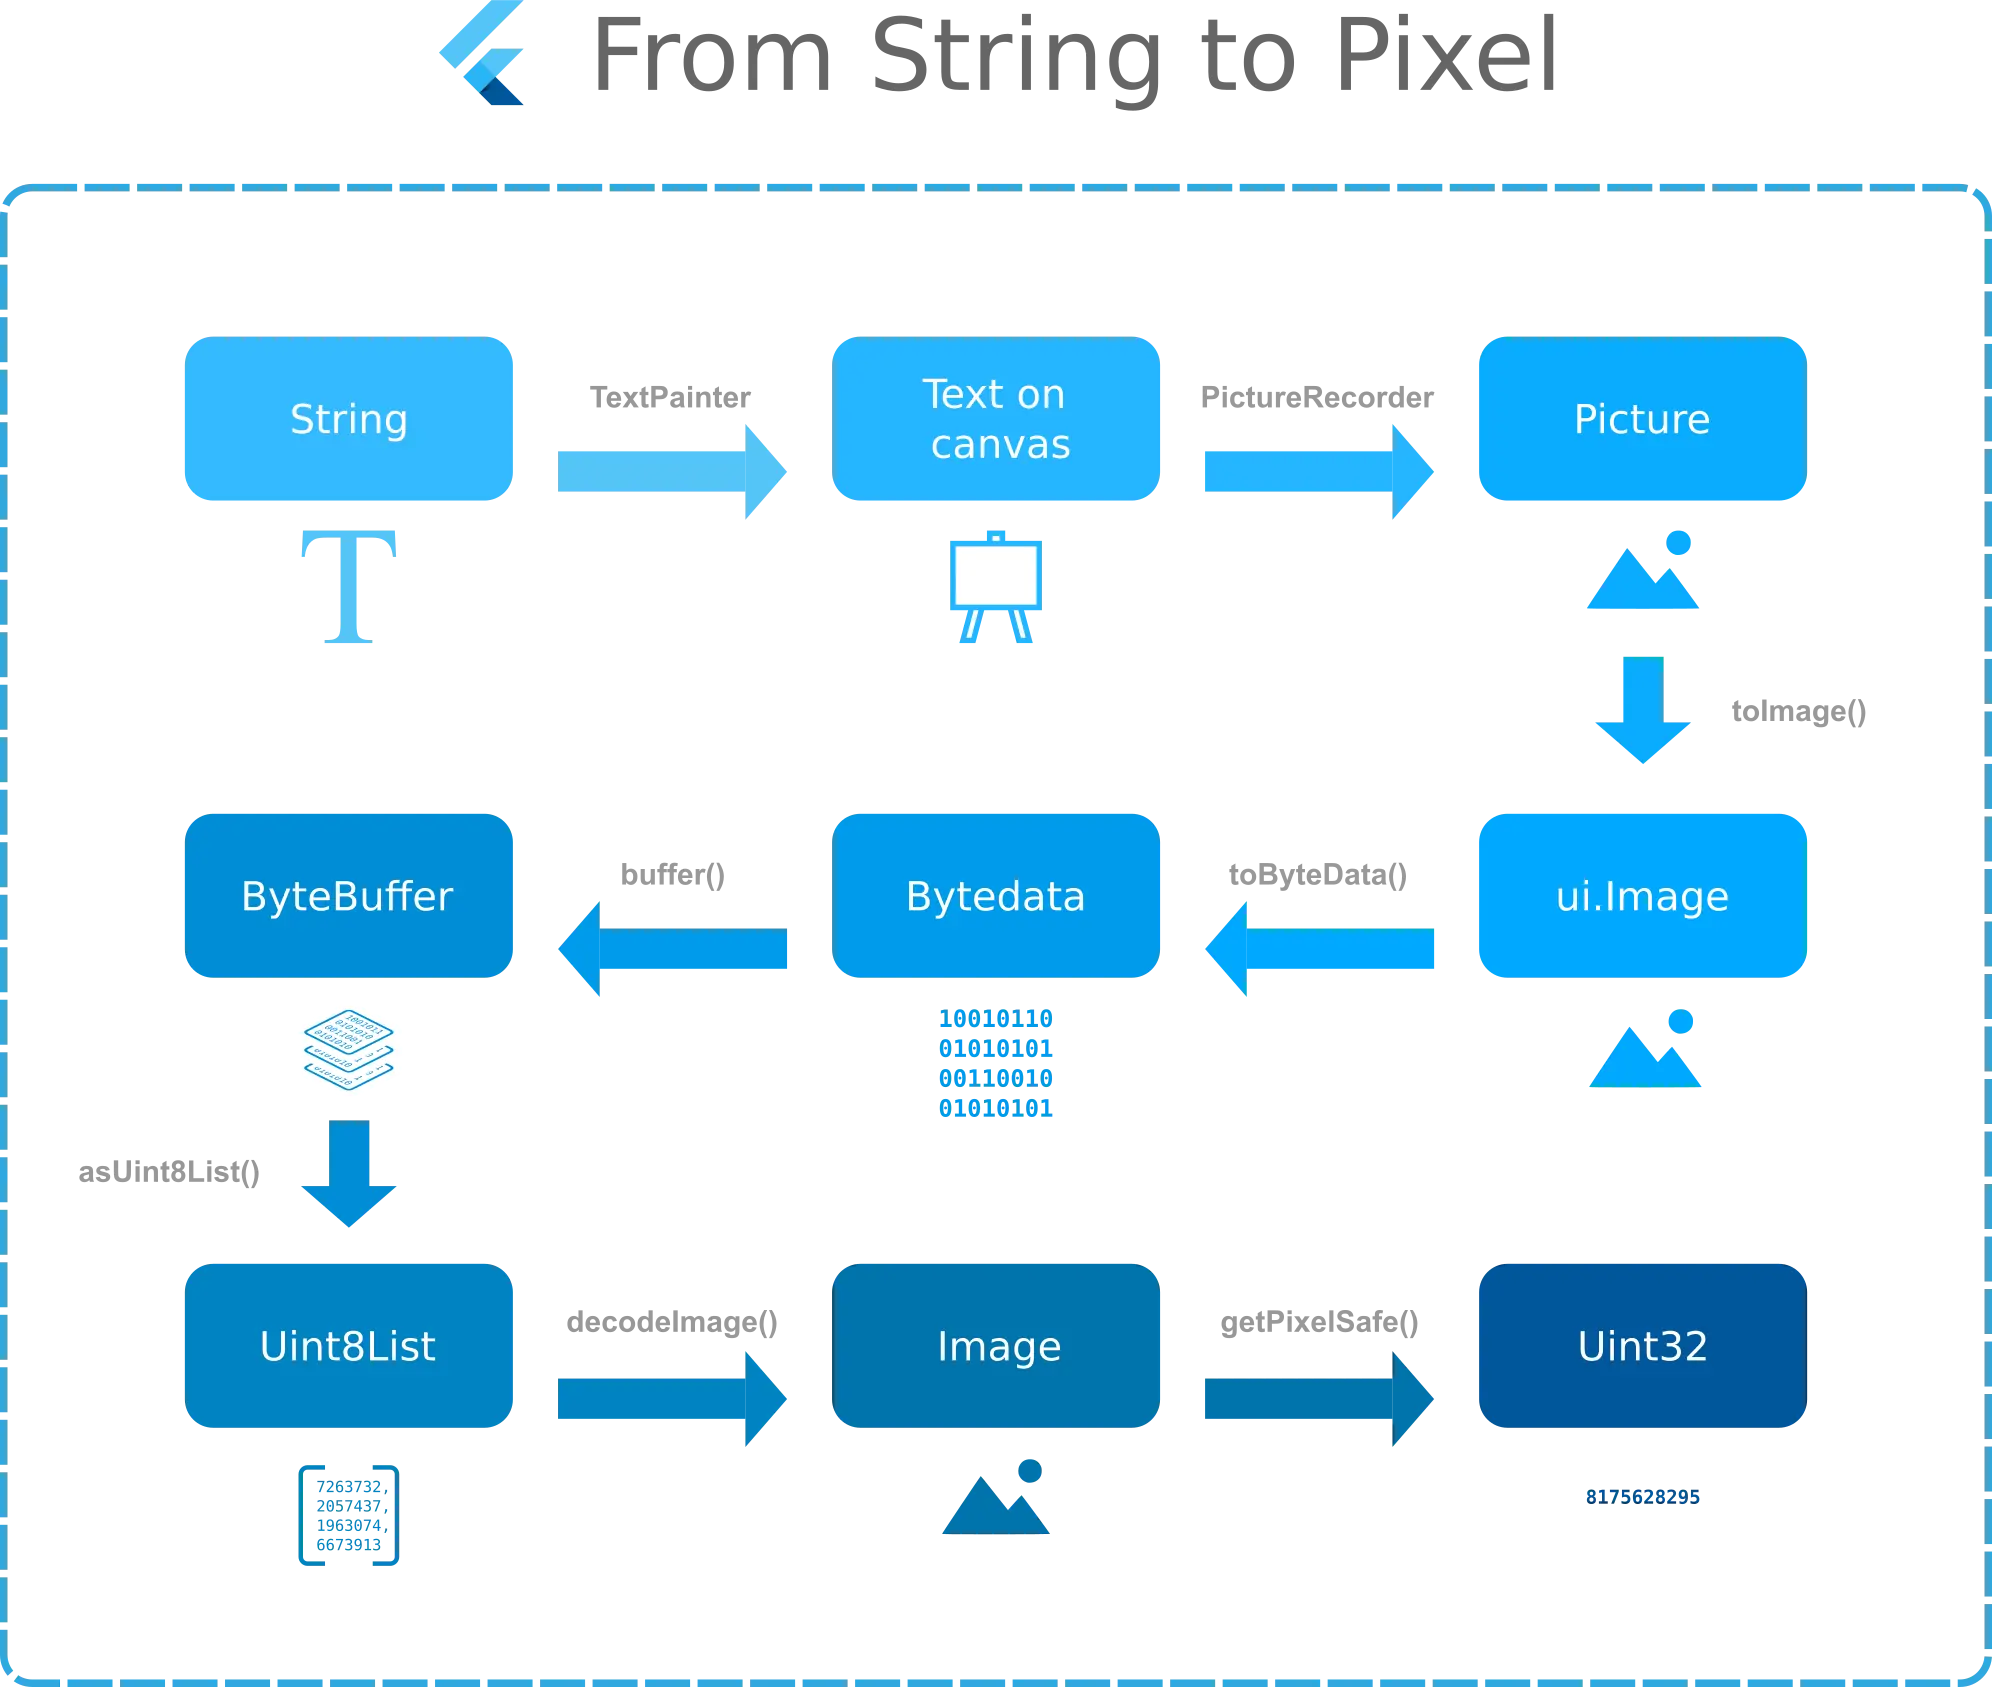
Okay, we now know how to access a pixel in some format of a third party package. How is that going to help? Well, if we manage to convert a text into an image, we can access its pixels from there. Good news: our good old friend, the Canvas class in combination with PictureRecorder is able to create a Picture with a toImage() function.
There are a more steps in between which make it a rather complex conversion chain, so let’s visualize what’s going on there:

You don’t need to understand every single step. What’s important to remember, though: directly accessing pixels of Widgets is not possible. Thus we need to to an intermediate conversion to a rendered image. This requires a canvas and an external package. Let’s head over to the implementation. Then everything will become clearer.
The implementation
We are going to have a bunch of classes to make the code more readable. The heart of our app will be the DisplaySimulator this widget represents the part that actually mimics the LED display. Because we want to have full control and draw the display ourselves, we also need a CustomPainter. This one will be called DisplayPainter.
Additionally, we need a component that takes a string and converts it to a two-dimensional list of pixels. This is what the ToPixelsConverter will be responsible of.
Let’s start with the DisplaySimulator:
 1import 'package:flutter/material.dart';
 2import 'package:flutter/services.dart';
 3
 4const canvasSize = 100.0;
 5
 6class DisplaySimulator extends StatefulWidget {
 7  DisplaySimulator({
 8    this.text,
 9    this.border = false,
10    this.debug = false
11  });
12
13  final String text;
14  final bool border;
15  final bool debug;
16
17
18  @override
19  _DisplaySimulatorState createState() => _DisplaySimulatorState();
20}
21
22class _DisplaySimulatorState extends State<DisplaySimulator> {
23  ByteData imageBytes;
24  List<List<Color>> pixels;
25
26  @override
27  Widget build(BuildContext context) {
28    _obtainPixelsFromText(widget.text);
29
30    return Column(
31      children: <Widget>[
32        SizedBox(height: 96,),
33        _getDebugPreview(),
34        SizedBox(height: 48,),
35        _getDisplay(),
36      ],
37    );
38  }
39
40  Widget _getDebugPreview() {
41    if (imageBytes == null || widget.debug == false) {
42      return Container();
43    }
44
45    return Image.memory(
46      Uint8List.view(imageBytes.buffer),
47      filterQuality: FilterQuality.none,
48      width: canvasSize,
49      height: canvasSize,
50    );
51  }
52
53  Widget _getDisplay() {
54    return Container();
55  }
56
57  void _obtainPixelsFromText(String text) async {
58    // Here we will set imageBytes and pixels
59  }
60}
The DisplaySimulator has three constructor arguments: the text which is obviously the text that is supposed to be displayed on the simulated display. The second argument border determines whether a border should be shown around the display. This can give a nice look. Third one is debug. As we discovered in the theory part, a lot of conversions happen from the initial string to the final effect. The crucial one is probably from the string to the byte data of the image. To make debugging easier, we add the possibility to display this intermediate conversion.
As a first iteration we only show the debugging part, not yet the actual display. So _getDisplay() only returns an empty Container whereas _getDebugPreview() returns an Image made from the buffer we expect to get from our ToPixelsConverter.
We need the imageBytes for the debugging part and the pixels for the display.
Okay, we know what the result of the conversion should look like. Let’s make a model class for that conversion result:
1class ToPixelsConversionResult {
2  ToPixelsConversionResult({
3    this.imageBytes,
4    this.pixels
5  });
6
7  final ByteData imageBytes;
8  final List<List<Color>> pixels;
9}
Now we implement the converter from string to pixels:
 1import 'dart:typed_data';
 2import 'dart:ui' as ui;
 3import 'package:flutter/material.dart';
 4import 'package:flutter/services.dart';
 5import 'package:flutter_digital_text_display/text_to_picture_converter.dart';
 6import 'package:image/image.dart' as imagePackage;
 7
 8class ToPixelsConverter {
 9  ToPixelsConverter.fromString({
10    @required this.string,
11    @required this.canvasSize,
12    this.border = false
13  });
14
15  String string;
16  Canvas canvas;
17  bool border;
18  final double canvasSize;
19
20  Future<ToPixelsConversionResult> convert() async {
21    final ui.Picture picture = TextToPictureConverter.convert(
22        text: this.string, canvasSize: canvasSize
23    );
24    final ByteData imageBytes = await _pictureToBytes(picture);
25    final List<List<Color>> pixels = _bytesToPixelArray(imageBytes);
26
27    return ToPixelsConversionResult(
28      imageBytes: imageBytes,
29      pixels: pixels
30    );
31  }
32
33  Future<ByteData> _pictureToBytes(ui.Picture picture) async {
34    final ui.Image img = await picture.toImage(canvasSize.toInt(), canvasSize.toInt());
35    return await img.toByteData(format: ui.ImageByteFormat.png);
36  }
37
38  List<List<Color>> _bytesToPixelArray(ByteData imageBytes) {
39    List<int> values = imageBytes.buffer.asUint8List();
40    imagePackage.Image decodedImage = imagePackage.decodeImage(values);
41    List<List<Color>> pixelArray = new List.generate(canvasSize.toInt(), (_) => new List(canvasSize.toInt()));
42
43    for (int i = 0; i < canvasSize.toInt(); i++) {
44      for (int j = 0; j < canvasSize.toInt(); j++) {
45        int pixel = decodedImage.getPixelSafe(i, j);
46        int hex = _convertColorSpace(pixel);
47        pixelArray[i][j] = Color(hex);
48      }
49    }
50
51    return pixelArray;
52  }
53
54  int _convertColorSpace(int argbColor) {
55    int r = (argbColor >> 16) & 0xFF;
56    int b = argbColor & 0xFF;
57    return (argbColor & 0xFF00FF00) | (b << 16) | r;
58  }
59}
We have one named constructor that has three arguments:
- string: This is required as it’s the text we are going to display. We are just going to pass through the argument from the parent widget
- canvasSize: The size of the canvas the text is rendered on. This is important is in combination with the font size it determines the size and count of the pixels
- border: Boolean that determines whether to display a border around the display. Also passed through from the parent
The only public method of this class is convert(). It takes the string and let it be converted to a Picture by the TextToPictureConverter, we are going to implement in a minute. This conversion is necessary to get the ByteData. This piece of information is used to iterate over the pixels, which are then turned into Color objects. If we store the original color, we can simulate multicolored LED displays.
It’s worth noting that the image library uses the KML color format which has also a hexadecimal representation, but the red and blue part is switched. Thus we need to convert #AABBGGRR to #AARRGGBB. This is essentially what _convertColorSpace() does.
We use Monospace font family to make every character have the same width and height.
Great, now that we have the conversion ready, we can use it to display our debug widget:
 1void _obtainPixelsFromText(String text) async {
 2  ToPixelsConversionResult result = await ToPixelsConverter.fromString(
 3    string: text, border: widget.border, canvasSize: canvasSize
 4  ).convert();
 5
 6  setState(() {
 7    this.imageBytes = result.imageBytes;
 8    pixels = result.pixels;
 9  });
10}
Now, in order to test everything, let’s quickly hack a Home widget that embeds the DisplaySimulator and puts a TextField underneath to allow the user to change the text that’s being displayed:
 1import 'package:flutter/material.dart';
 2import 'display_simulator.dart';
 3
 4class Home extends StatefulWidget {
 5  @override
 6  _HomeState createState() => _HomeState();
 7}
 8
 9class _HomeState extends State<Home> {
10  String text;
11
12  @override
13  void initState() {
14    text = '';
15    super.initState();
16  }
17
18  @override
19  Widget build(BuildContext context) {
20    return SingleChildScrollView(
21      child: Align(
22        alignment: Alignment.topCenter,
23        child: Column(
24          children: [
25            DisplaySimulator(
26              text: text,
27              border: false,
28              debug: true,
29            ),
30            SizedBox(height: 48),
31            _getTextField()
32          ],
33        )
34      )
35    );
36  }
37
38  Container _getTextField() {
39    BorderSide borderSide = BorderSide(color: Colors.blue, width: 4);
40    InputDecoration inputDecoration = InputDecoration(
41      border: UnderlineInputBorder(borderSide: borderSide),
42      disabledBorder: UnderlineInputBorder(borderSide: borderSide),
43      enabledBorder: UnderlineInputBorder(borderSide: borderSide),
44      focusedBorder: UnderlineInputBorder(borderSide: borderSide),
45    );
46
47    return Container(
48      width: 200,
49      child: TextField(
50        maxLines: null,
51        enableSuggestions: false,
52        textAlign: TextAlign.center,
53        style: TextStyle(
54          color: Colors.yellow,
55          fontSize: 32,
56          fontFamily: "Monospace"
57        ),
58          decoration: inputDecoration,
59          onChanged: (val) {
60            setState(() {
61              text = val;
62            });
63          },
64      )
65    );
66  }
67}
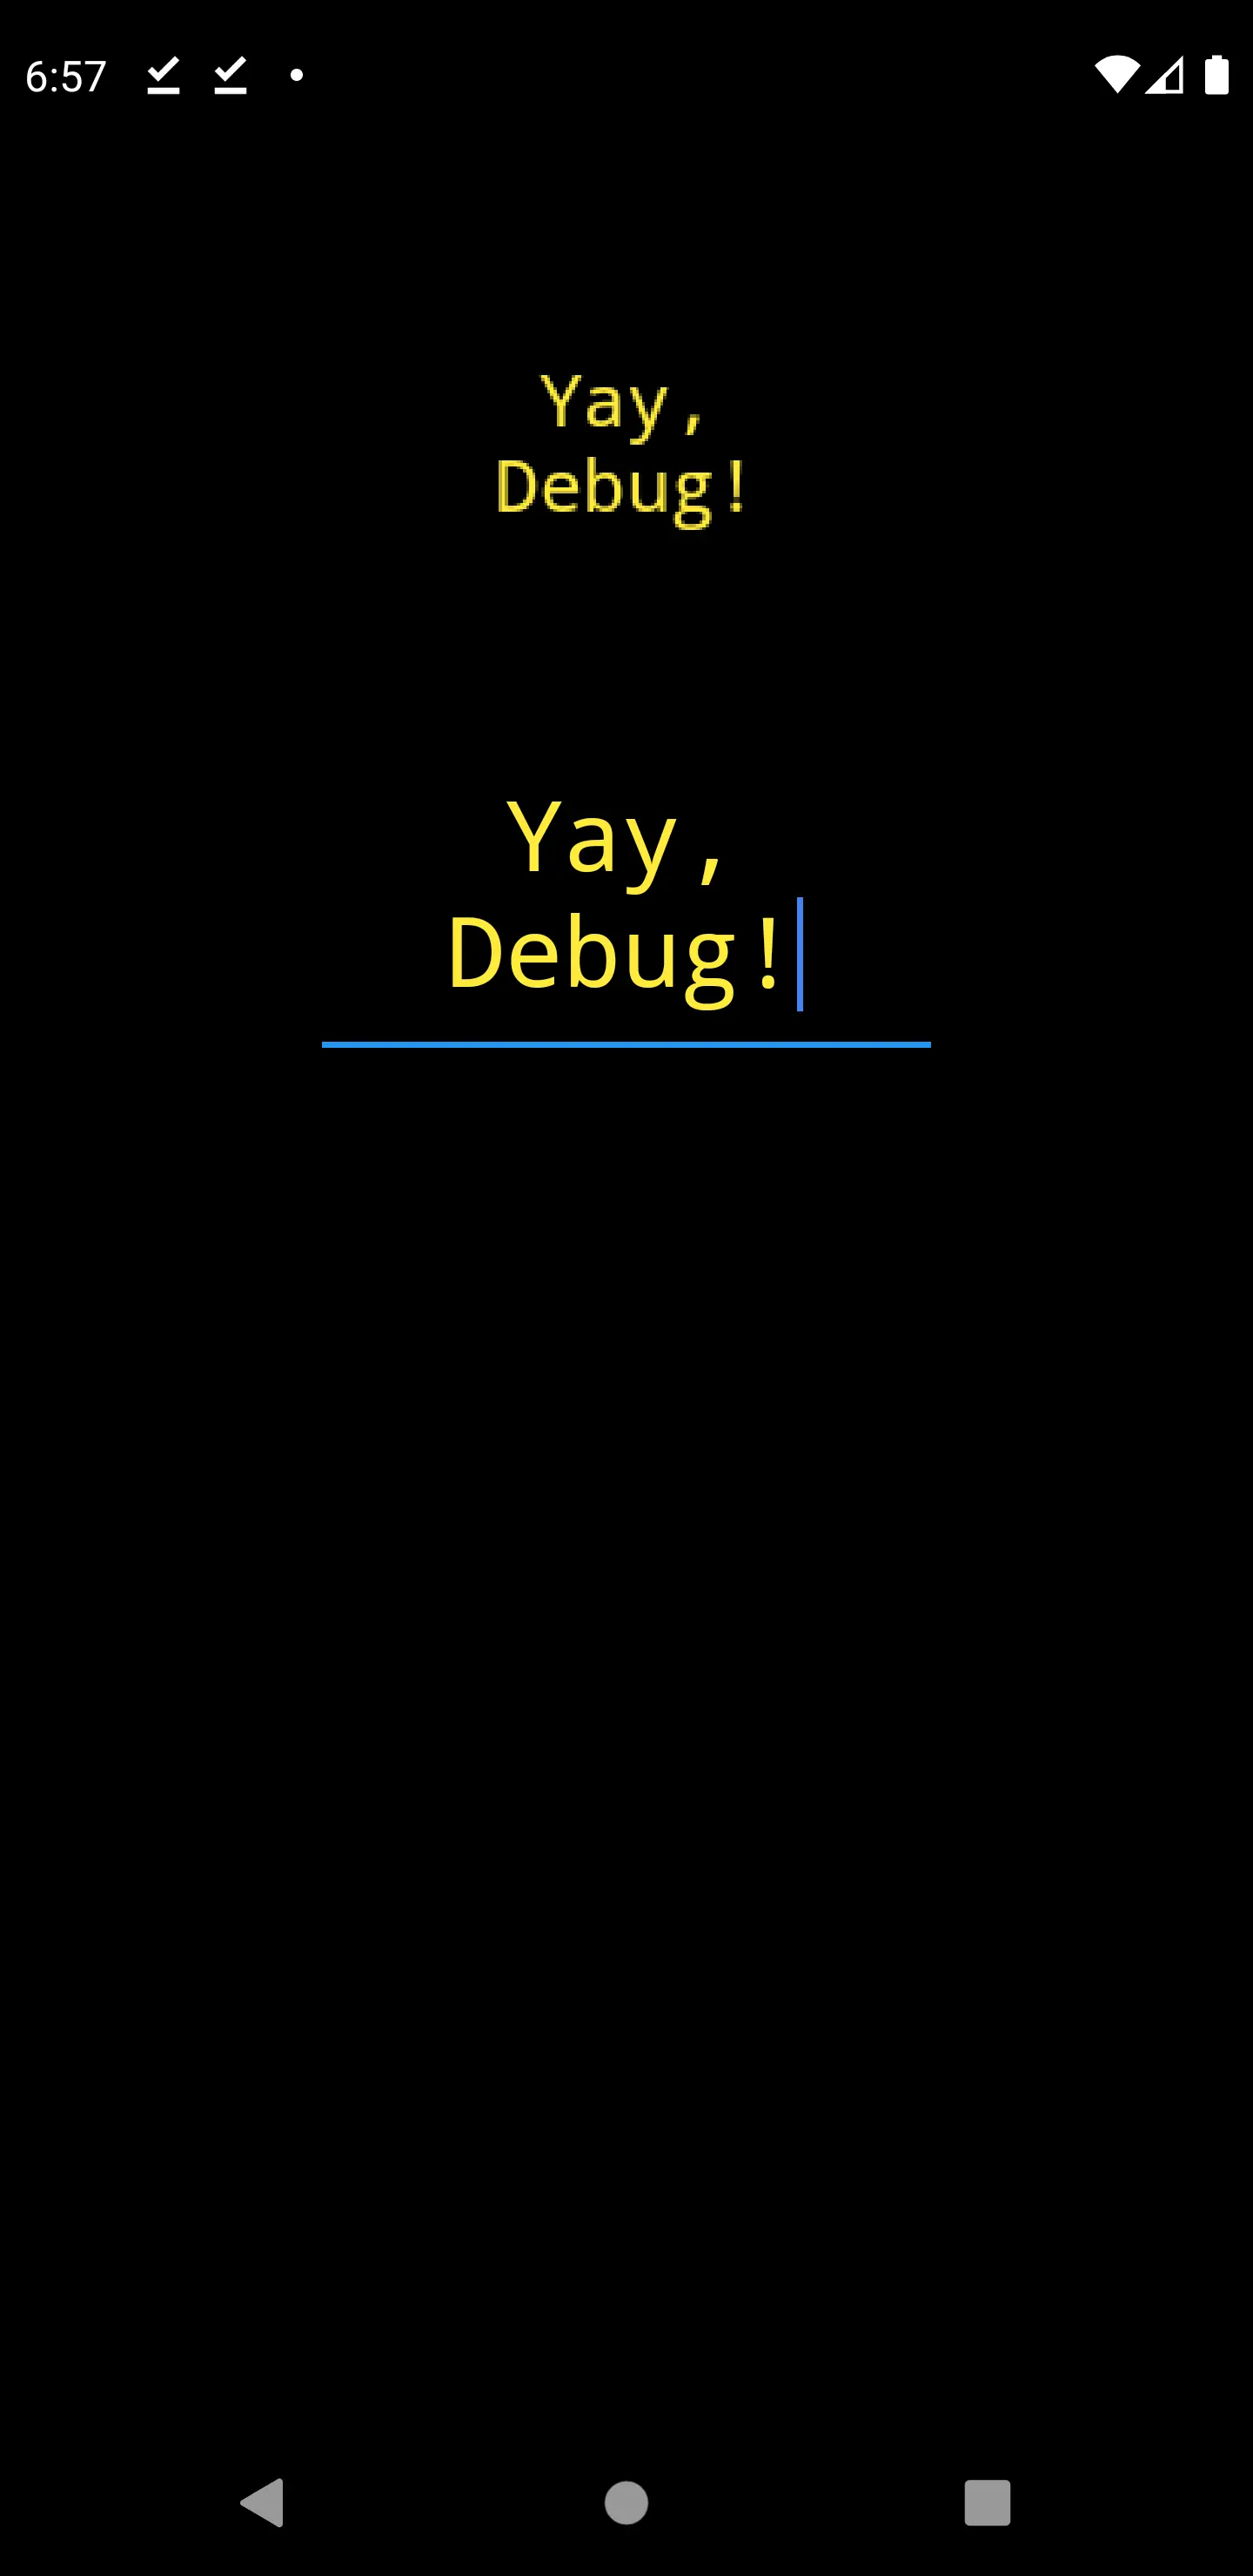
Okay, if we start the app, we see the input field but not the debug widget. Although it seems that it sometimes flickers and appears. That’s an issue being discussed on Github and the fix seems fairly simple.
 1Widget _getDebugPreview() {
 2  if (imageBytes == null || widget.debug == false) {
 3    return Container();
 4  }
 5
 6  return Image.memory(
 7    Uint8List.view(imageBytes.buffer),
 8    gaplessPlayback: true,
 9    filterQuality: FilterQuality.none,
10    width: canvasSize,
11    height: canvasSize,
12  );
13}

Awesome. We enter text and are able to see a rendered image containing the very same text. Now we are going to use the pixel array to display the actual LED display.
We need to implement the getDisplay() method of the DisplaySimulator widget. At first, I’ve tried to do that using the widget tree with something like this:
 1Widget _getDisplay() {
 2  if (pixels == null) {
 3    return Container();
 4  }
 5
 6  return Container(
 7    color: Colors.black87,
 8    child:
 9    Row(
10      children: [
11        for (int i = 0; i < pixels.length; i++)
12          Column(
13            children: [
14            for (int j = 0; j < pixels.length; j++)
15              Container(
16                decoration: BoxDecoration(
17                  borderRadius: BorderRadius.all(Radius.circular(4)),
18                  color: pixels[i][j],
19                ),
20                height: 4,
21                width: 4,
22              ),
23            ]
24          )
25      ],
26    )
27  );
28}
Unfortunately, the performance was very poor. The display was lagging every time I typed a new character. Also, the the text easily went across the border. I then decided to go for the CustomPaint approach. This makes our getDisplay() method rather small:
 1Widget _getDisplay() {
 2  if (pixels == null) {
 3    return Container();
 4  }
 5
 6  return CustomPaint(
 7    size: Size.square(MediaQuery.of(context).size.width),
 8    painter: DisplayPainter(pixels: pixels, canvasSize: canvasSize)
 9  );
10}
The display logic can be found in the CustomPainter called DisplayPainter:
 1import 'dart:ui';
 2import 'package:flutter/material.dart';
 3
 4class DisplayPainter extends CustomPainter {
 5  DisplayPainter({
 6    this.pixels, this.canvasSize
 7  });
 8
 9  List<List<Color>> pixels;
10  double canvasSize;
11
12  @override
13  void paint(Canvas canvas, Size size) {
14    if (pixels == null) {
15      return;
16    }
17
18    canvas.drawRect(Rect.fromLTWH(0, 0, size.width, size.height), Paint()..color = Colors.black);
19
20    double widthFactor = canvasSize / size.width;
21
22    Paint rectPaint = Paint()..color = Colors.black;
23    Paint circlePaint = Paint()..color = Colors.yellow;
24
25    for (int i = 0; i < pixels.length; i++) {
26      for (int j = 0; j < pixels[i].length; j++) {
27
28        var rectSize = 1.0 / widthFactor;
29        var circleSize = 0.3 / widthFactor;
30
31        canvas.drawRect(
32            Rect.fromCenter(
33                center: Offset(
34                    i.toDouble() * rectSize + rectSize / 2,
35                    j.toDouble() * rectSize + rectSize / 2
36                ),
37                width: rectSize,
38                height: rectSize
39            ),
40            rectPaint
41        );
42
43        if (pixels[i][j].opacity < 0.3) {
44          continue;
45        }
46
47        canvas.drawCircle(
48            Offset(
49              i.toDouble() * rectSize  + rectSize / 2 - circleSize / 2,
50              j.toDouble() * rectSize  + rectSize / 2 - circleSize / 2,
51            ),
52            circleSize,
53            circlePaint
54        );
55      }
56    }
57  }
58
59  @override
60  bool shouldRepaint(CustomPainter oldDelegate) {
61    return true;
62  }
63}
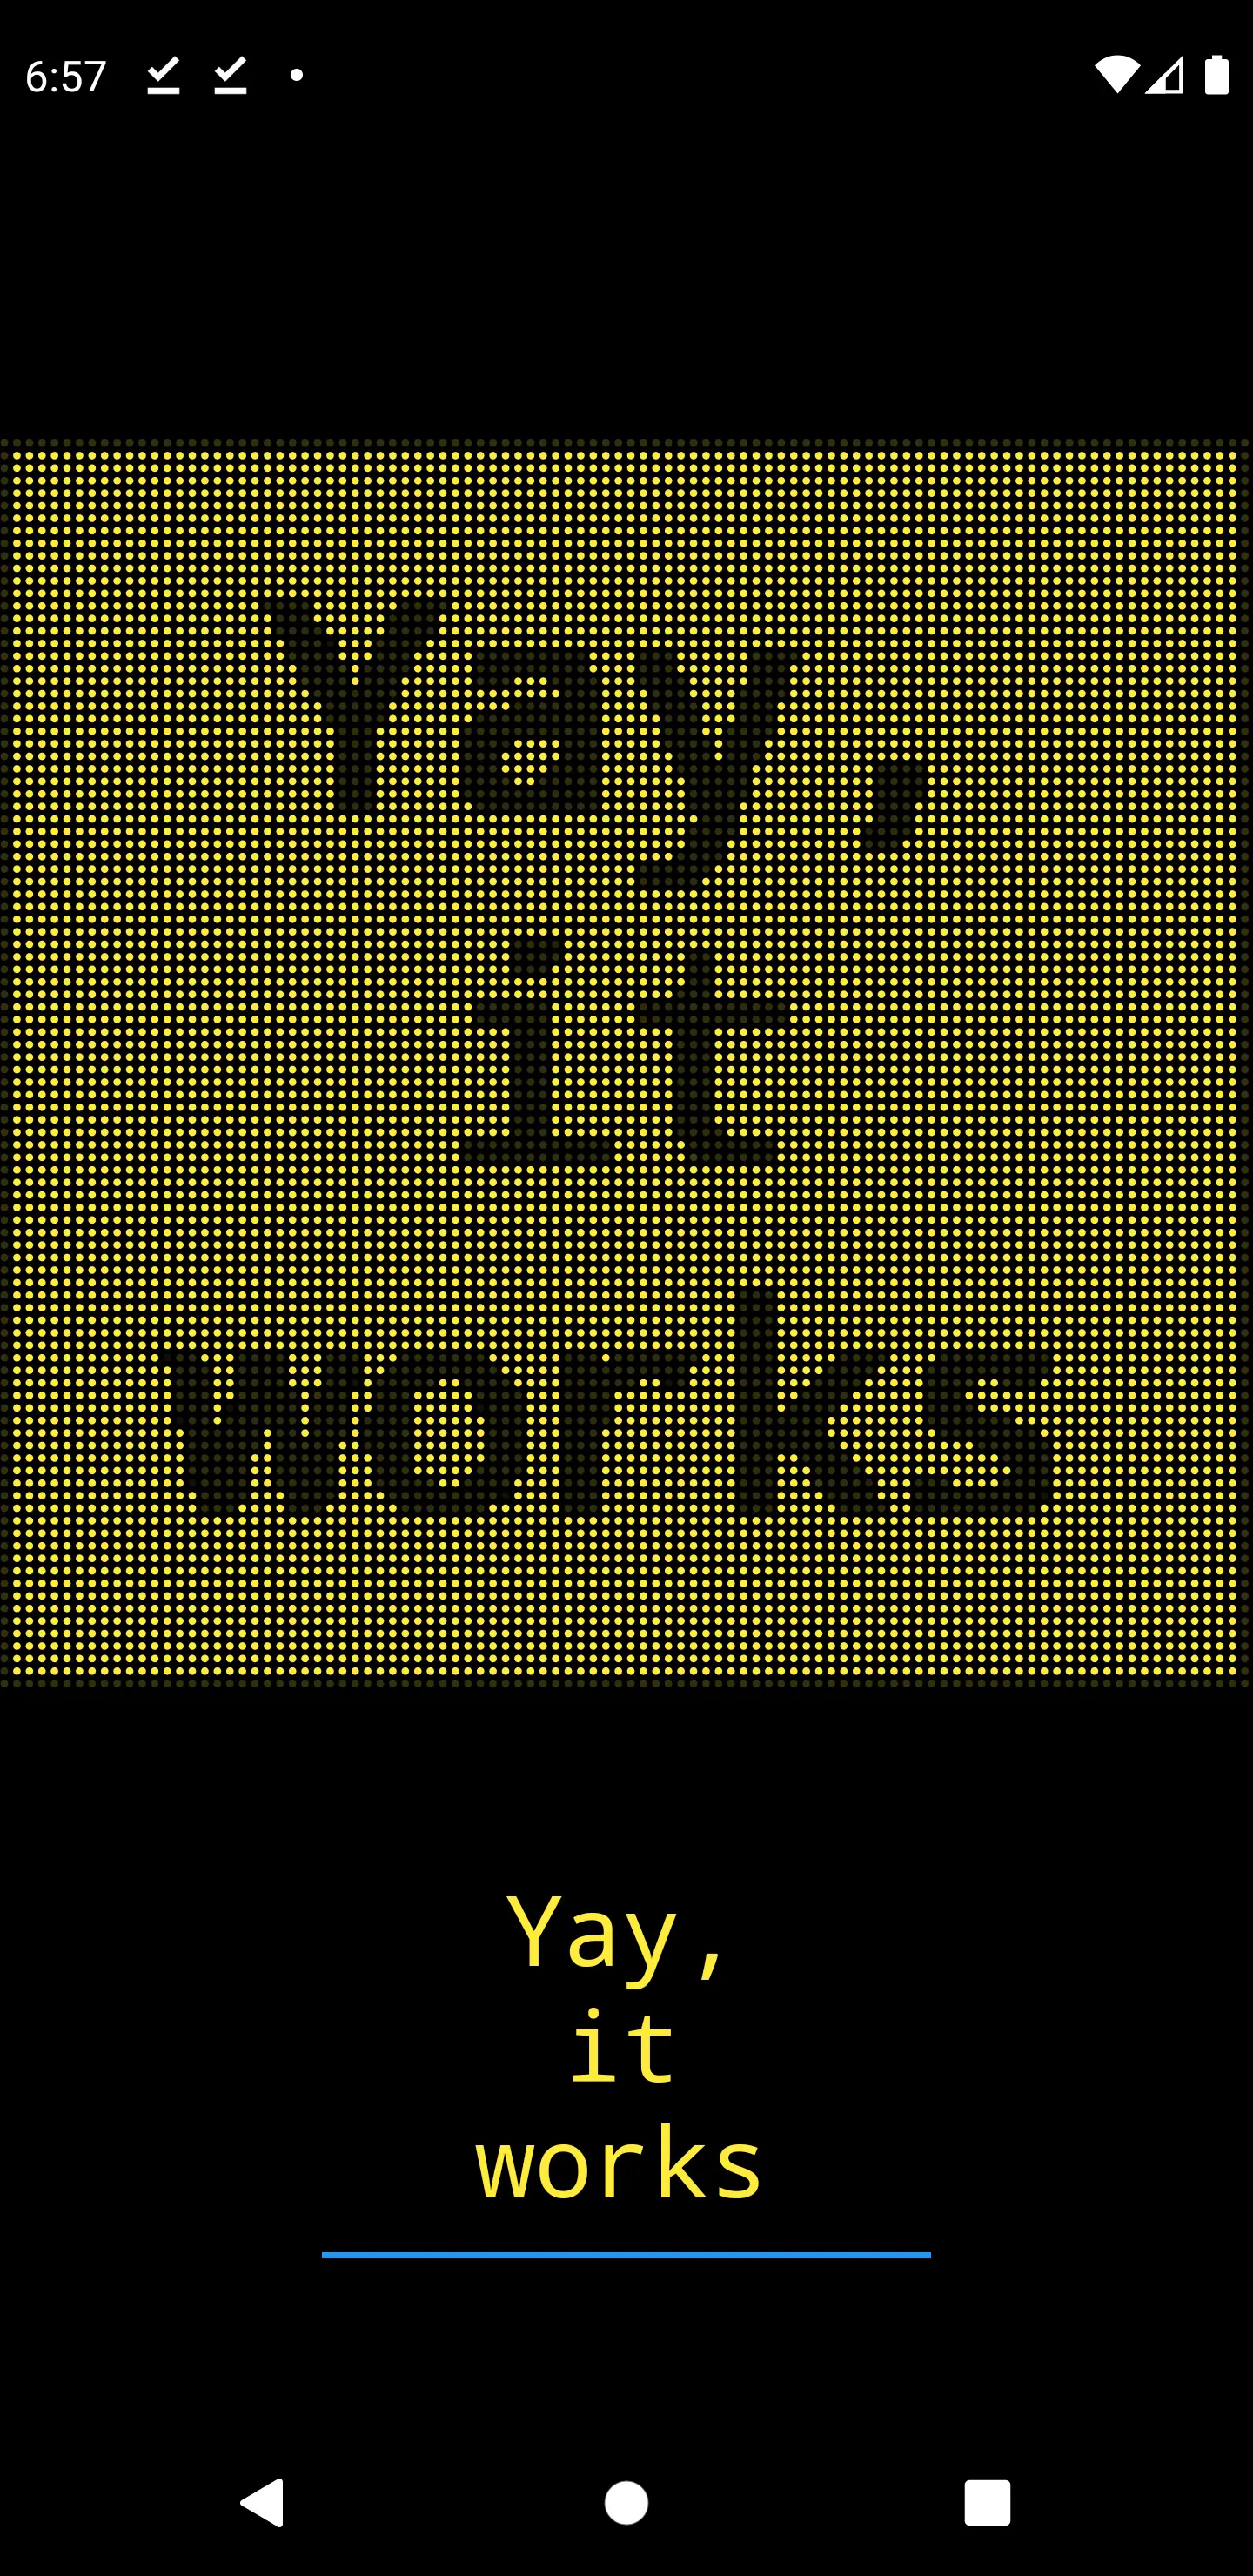
We start with a mono-colored display. For this, we only draw every pixel with an opacity of more than 30 %. This lets us get rid of the anti-aliased pixels. We then use a static color (yellow in this case) to draw every pixel of the canvas based image. We then stretch the painted image across the hole width, which is the screen width (because we call it with MediaQuery.of(context).size). This makes it look like this:

Very cool! Our first working display.
If we remove the condition that only display pixels with opacity more that 30 % and let the paint color be yellow with the luminance determined by the opacity of the pixel, we can invert the effect.
1canvas.drawCircle(
2    Offset(
3      i.toDouble() * rectSize  + rectSize / 2 - circleSize / 2,
4      j.toDouble() * rectSize  + rectSize / 2 - circleSize / 2,
5    ),
6    circleSize,
7    circlePaint..color = Colors.yellow.withOpacity(1-pixels[i][j].computeLuminance())
8);
This looks as follows:

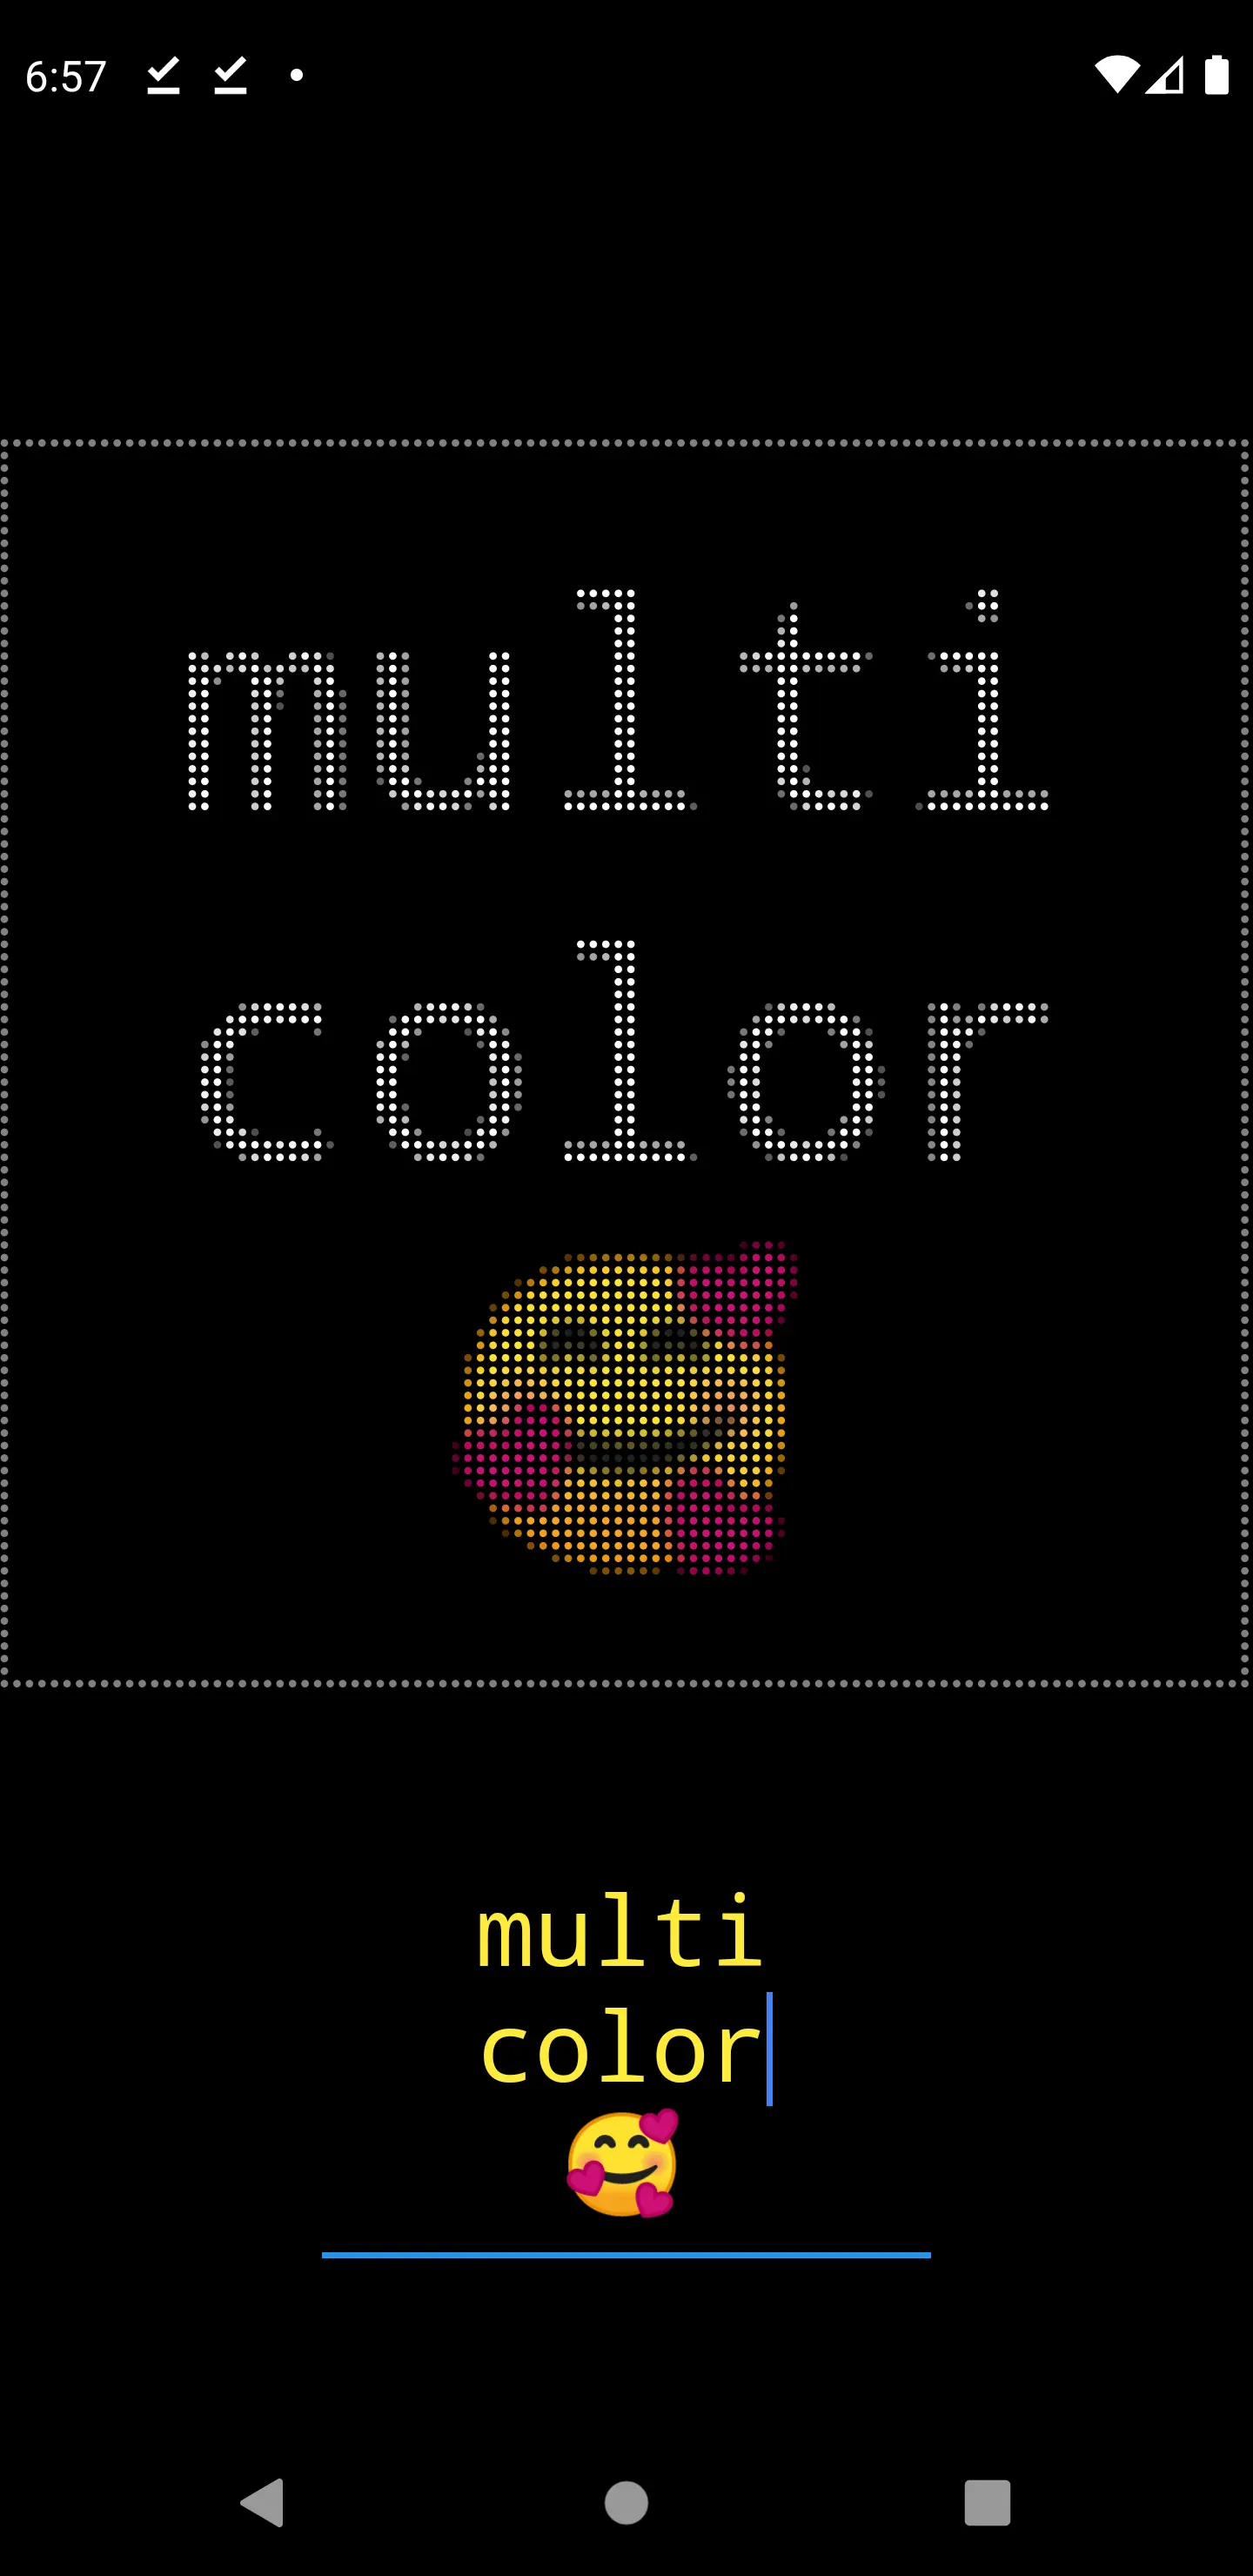
A mono-colored display is cool as long as we only have plain text. But the Flutter logo looks a little bit sad like this. And what about Emojis? If we type them now, we only get a yellow blob. So how about actually using the color information we previously stored in the pixels list?
1canvas.drawCircle(
2    Offset(
3      i.toDouble() * rectSize  + rectSize / 2 - circleSize / 2,
4      j.toDouble() * rectSize  + rectSize / 2 - circleSize / 2,
5    ),
6    circleSize,
7    circlePaint..color = pixels[i][j]
8);


Final words
Accessing the raw pixels of a widget is not easy and in the high abstraction level Flutter provides us, not possible. However, it can be achieved using a trick: a conversion chain from text to canvas to picture actually allows us to access the pixels. With this piece of data we can easily create a simulated LED display by arranging the pixels with a little bit of distance next to each other and drawing them as circles.
Maybe you have additional ideas what cool effects can be achieved using this information?
GET FULL CODE


lety
ben nguyen
Marc
In reply to ben nguyen's comment
Ifeanyi
Marc
In reply to Ifeanyi's comment