Styling the whole TextField can be done via the InputDecoration. But what if you have special styling in mind for only parts of the text? Let’s have a look at how to do it.
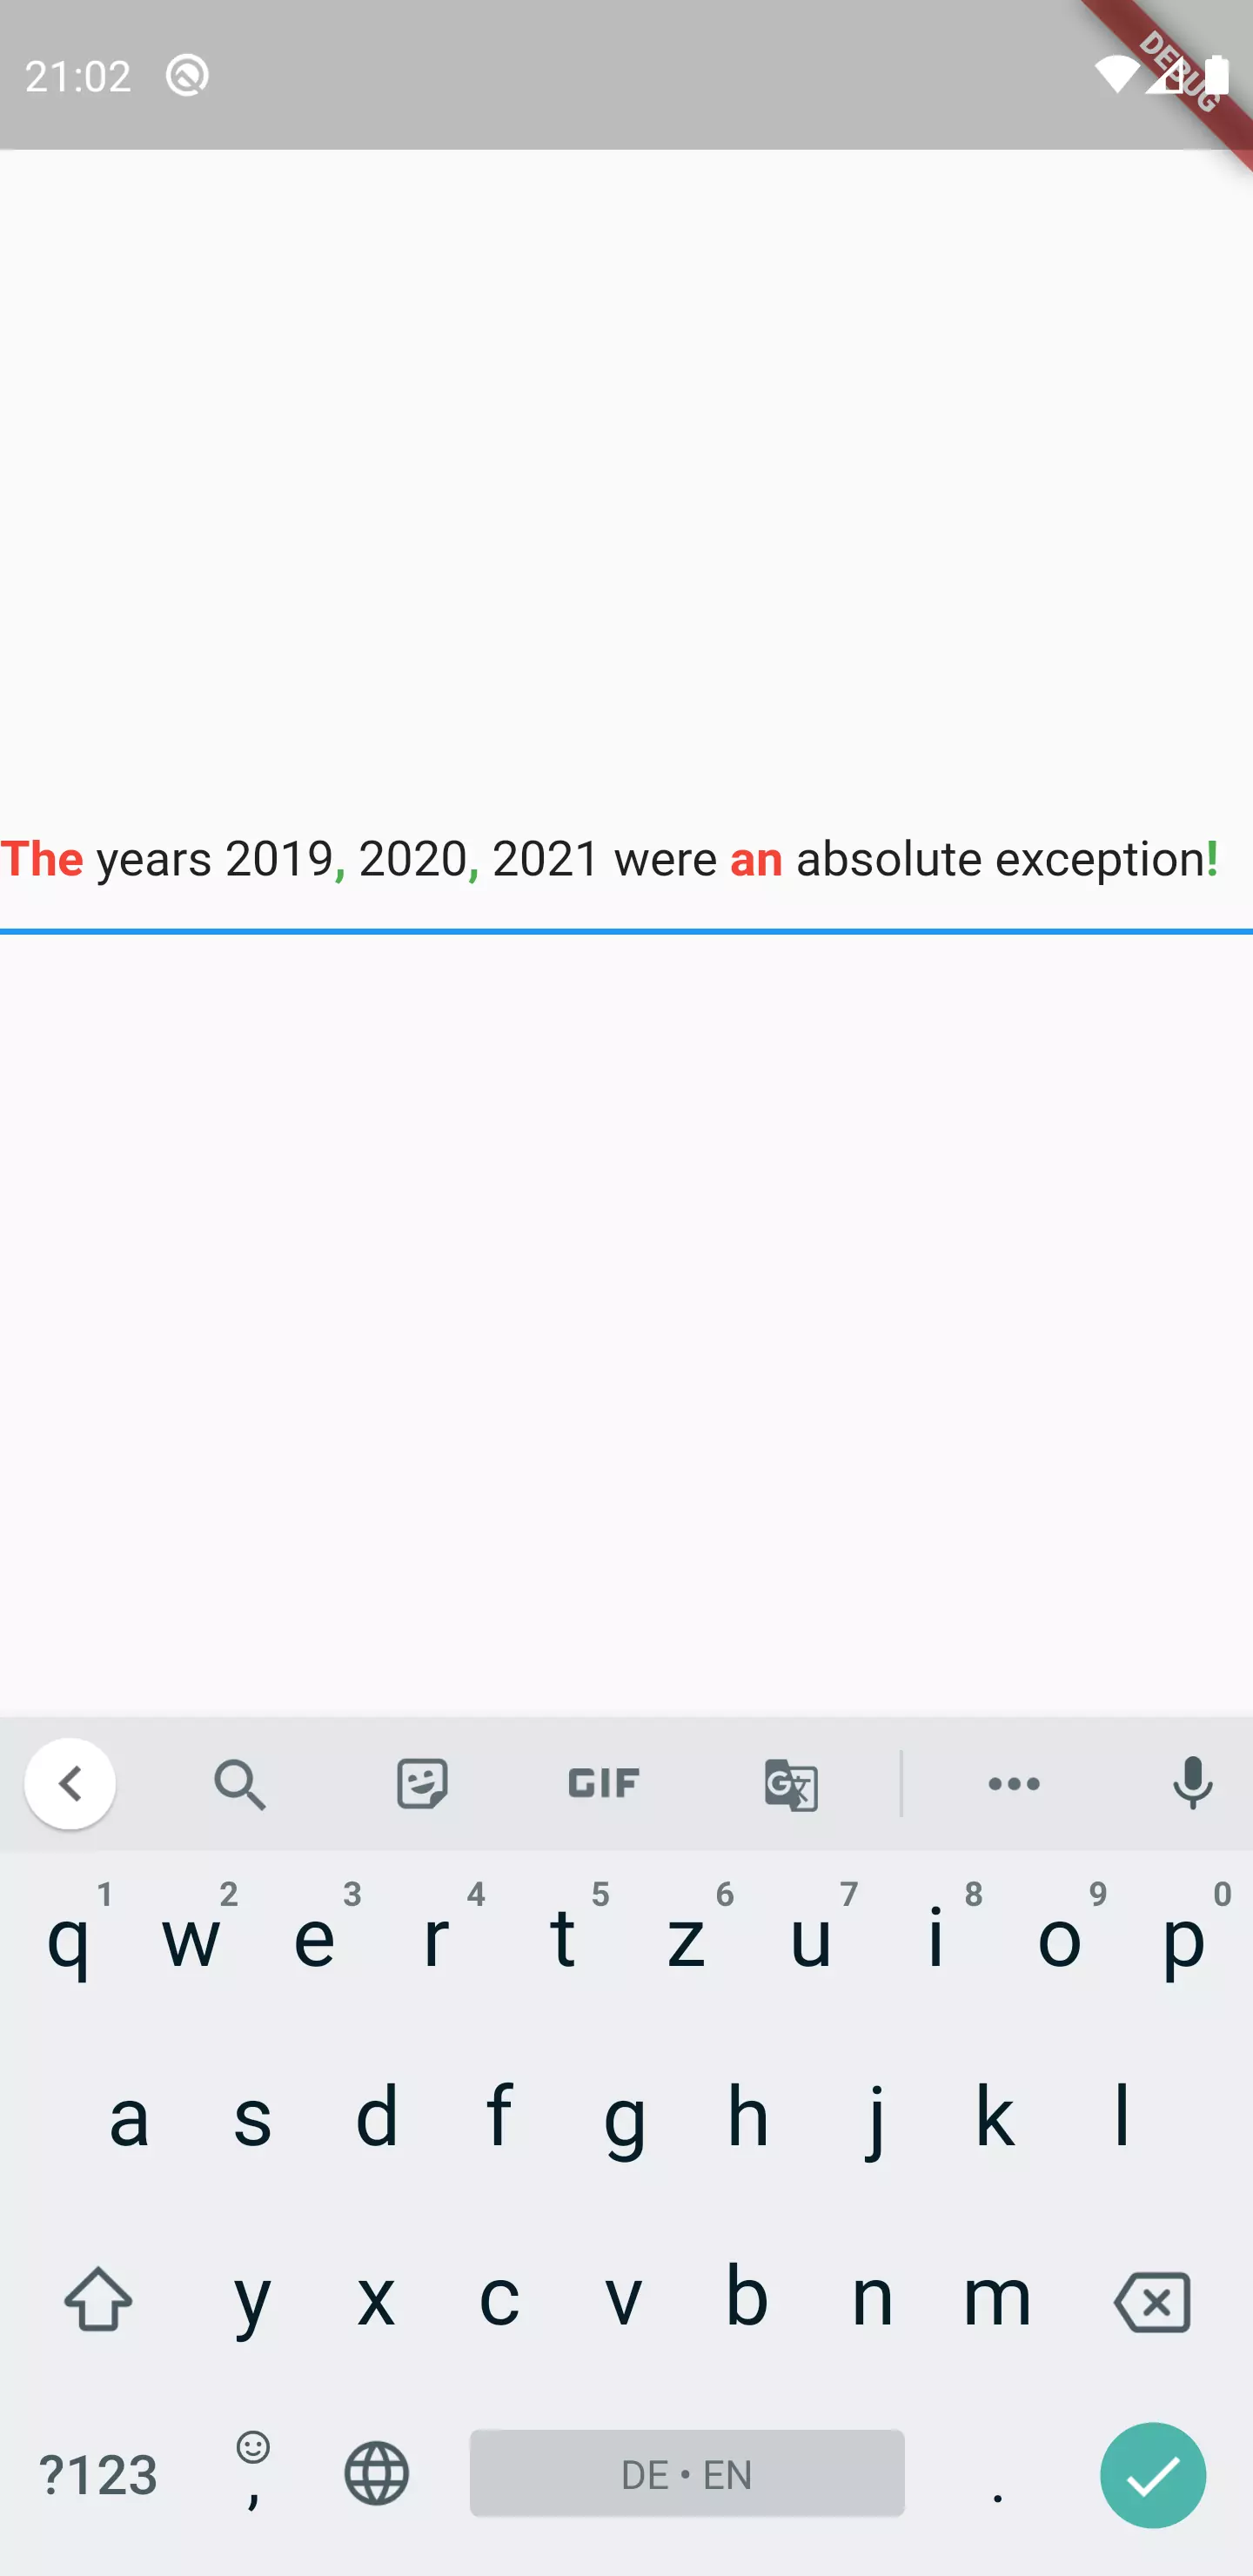
For this case, let’s consider an example, in which every punctuation mark is highlighted green and bold. Also, we want every article to be marked red and bold. That’s because we have some kind of language learning app that teaches grammar.

Extending a TextEditingController
It might be surprising but in order to style parts of a TextField, we will not write a new widget. Instead, we will extend the TextEditingController class. The reason is that the TextEditingController, which can be tied to a TextField using the controller property, provides a method called buildTextSpan, which we will override.
Before we go into the implementation details of what we want to create, let’s first examine what this method does and how it works as it will give us a better foundation we can build upon.
To achieve this, we can have a look at the implementation of this method in the base class:
 1TextSpan buildTextSpan({required BuildContext context, TextStyle? style , required bool withComposing}) {
 2  assert(!value.composing.isValid || !withComposing || value.isComposingRangeValid);
 3  if (!value.isComposingRangeValid || !withComposing) {
 4    return TextSpan(style: style, text: text);
 5  }
 6  final TextStyle composingStyle = style?.merge(const TextStyle(decoration: TextDecoration.underline))
 7      ?? const TextStyle(decoration: TextDecoration.underline);
 8  return TextSpan(
 9    style: style,
10    children: <TextSpan>[
11      TextSpan(text: value.composing.textBefore(value.text)),
12      TextSpan(
13        style: composingStyle,
14        text: value.composing.textInside(value.text),
15      ),
16      TextSpan(text: value.composing.textAfter(value.text)),
17    ],
18  );
19}
Brief excursion: TextRange
You might ask yourself why there is a need to check about a composing range and what this even is.
In fact, TextRange is nothing else but a representation of a range of characters inside a String. This range can also be empty or only 1 character long.
The class provides some methods to access the characters. Let’s look at an example to make it more clear:
1const TextRange range = TextRange(start: 6, end: 11);
2const String text = 'Hello world!';
3
4print(range.textBefore(text));
5print(range.textInside(text));
6print(range.textAfter(text));
We create a new TextRange object with start set to 6 and end set to 11. Afterwards, we print the return value of textBefore(), textInside() and textAfter()
This would give the following output:
I think it’s pretty clear how it works. start and end are the indexes of the range. textBefore() returns all the characters with an index lower than start for the given String. textInside() returns all characters within the index range (end is inclusive). textAfter() returns the substring of every character with a greater index than end.
But why is there a TextRange in the context of a TextField?
At least on Android, the word you are currently typing (or that is hit by the cursor), is marked as underlined. So you know that e. g. the suggestions from the auto correct are referring to the respective word. Everything before and after is not formatted in a special way.
So if we want to access the currently selected word, we can use the composing property of TextEditingValue that represents the above mentioned text that is currently being composed as a TextRange.
Back to the TextEditingController
But the essential part of the buildTextSpan method has not been covered yet:
 1return TextSpan(
 2    style: style,
 3    children: <TextSpan>[
 4      TextSpan(text: value.composing.textBefore(value.text)),
 5      TextSpan(
 6        style: composingStyle,
 7        text: value.composing.textInside(value.text),
 8      ),
 9      TextSpan(text: value.composing.textAfter(value.text)),
10    ],
11  );
It returns a TextSpan, which is a class you might know from RichText, allowing you to separately address the format of parts of a text.
We have the same mechanic here.
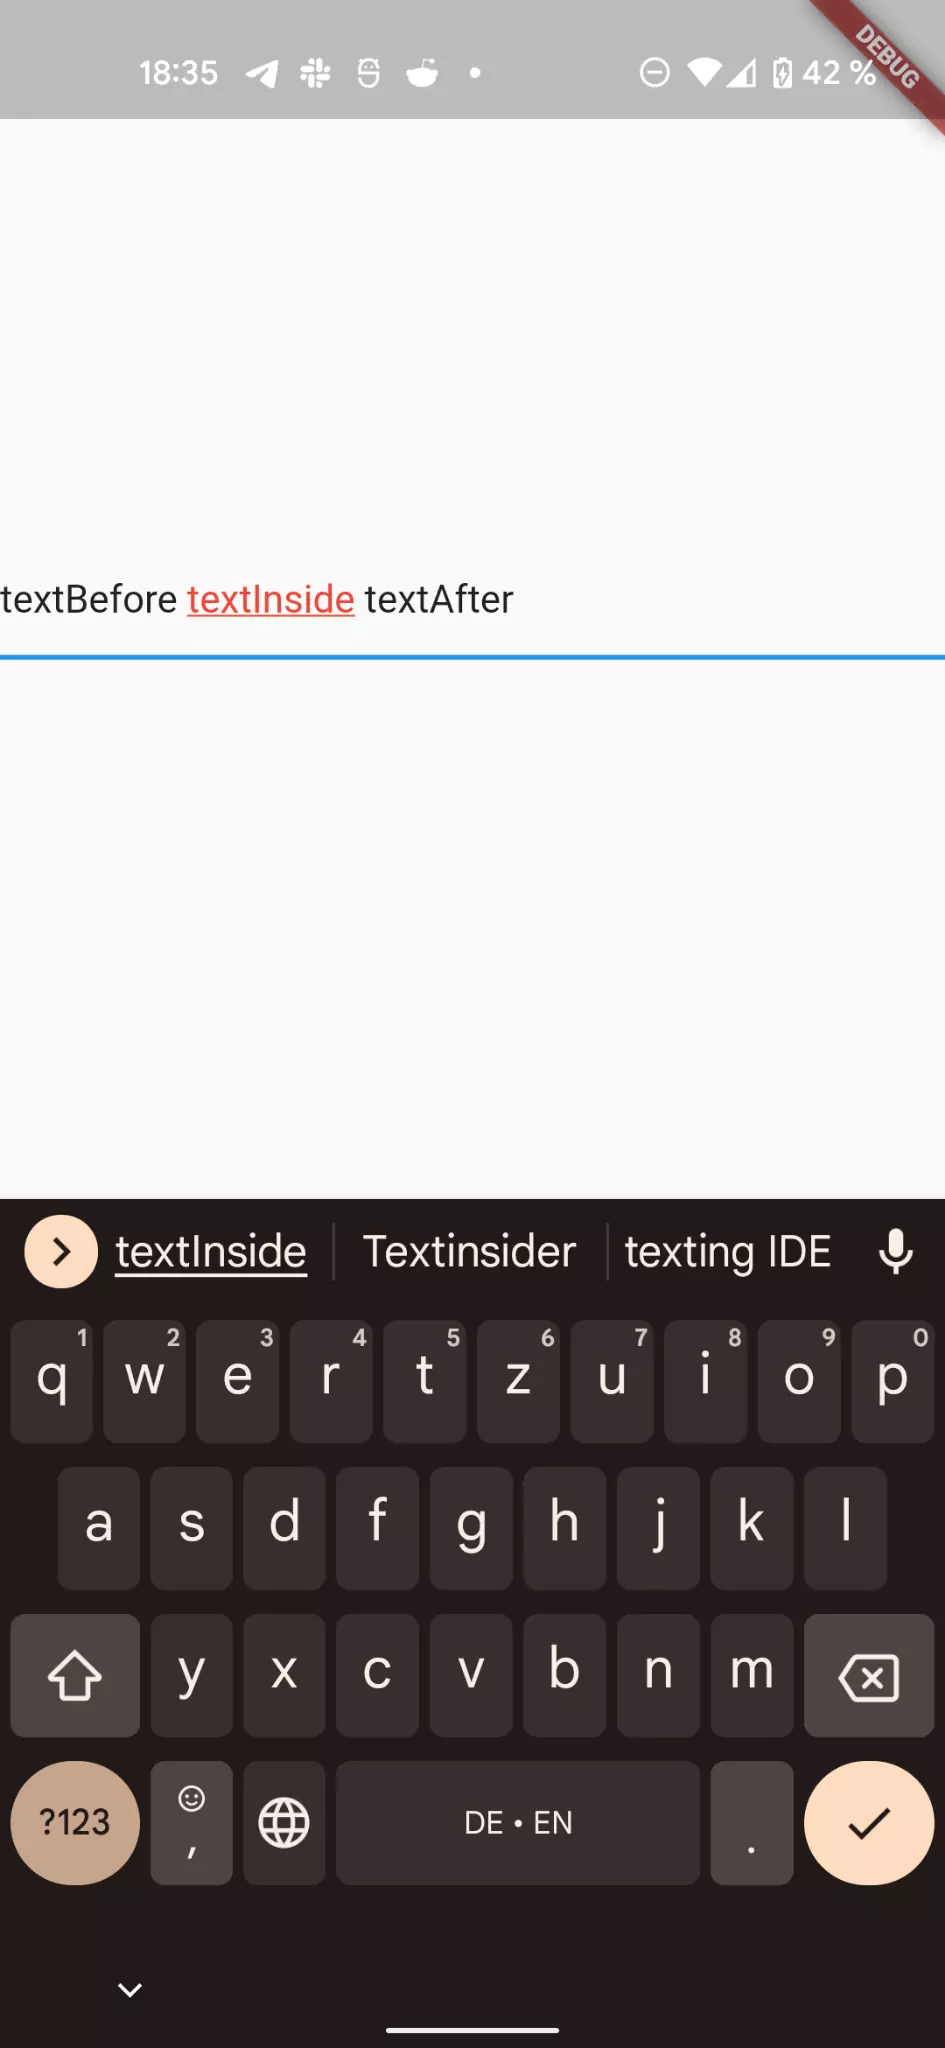
If we changed the above method in a way that the value.composing.textInside() gets a red color added as a styling:
 1return TextSpan(
 2  style: style,
 3  children: <TextSpan>[
 4    TextSpan(text: value.composing.textBefore(value.text)),
 5    TextSpan(
 6      style: const TextStyle(
 7        color: Colors.red,
 8        decoration: TextDecoration.underline,
 9      ),
10      text: value.composing.textInside(value.text),
11    ),
12    TextSpan(text: value.composing.textAfter(value.text)),
13  ],
14);
The mentioned behavior would result in this:

Overriding the buildTextSpan() method
Okay, let’s conclude what we know so far: we can extend the TextEditingController and we can override the buildTextSpan() method in order to influence the format / style of the displayed text inside the connected TextField.
Now, instead of defining a static behavior like above, we want to keep it dynamic so that the caller of our TextField constructor can decide, which part of the the text should be styled in which way.
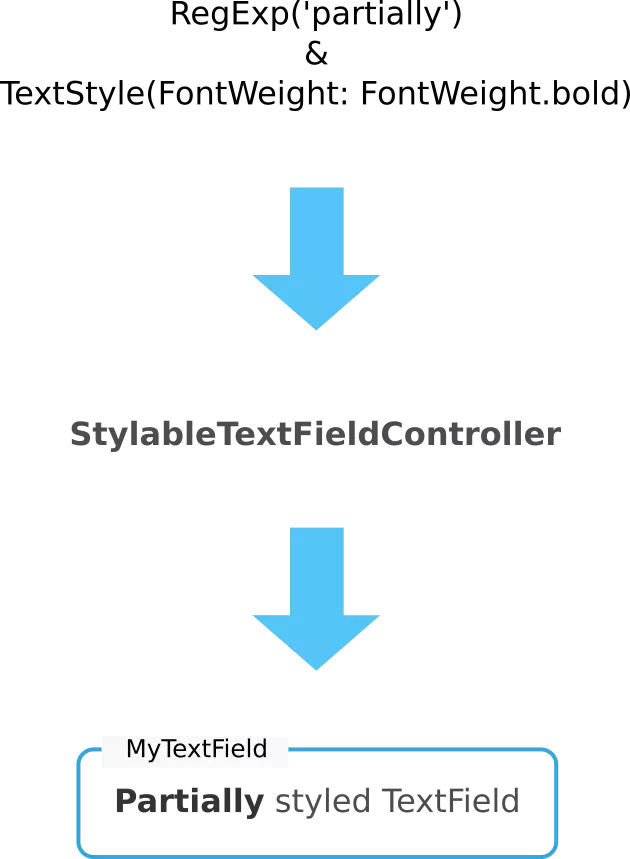
What is a common way to select text? You guessed it: regular expressions. So basically we want the constructor to expect a pattern and a corresponding styling. Actually not only one, but rather a list because we want to be able to define multiple styles.
Visually speaking, the input and output chain can be represented like this:

At first, we should start with a model of what we just described:
1class TextPartStyleDefinition {
2  TextPartStyleDefinition({
3    required this.pattern,
4    required this.style,
5  });
6
7  final String pattern;
8  final TextStyle style;
9}
Like it was being said, our model has two properties: pattern representing the String of the regular expression and style which is the TextStyle that is applied to what the regular expression matches.
Now we want to be able to style multiple parts of the text. That’s why we need a model that wraps a list of TextPartStyleDefinition:
1class TextPartStyleDefinitions {
2  TextPartStyleDefinitions({required this.definitionList});
3
4  final List<TextPartStyleDefinition> definitionList;
5}
Yet, this is nothing else but a thin wrapper with not additional value. But we will add methods to it once we need them.
Let’s continue with creating our custom controller:
1class StyleableTextFieldController extends TextEditingController {
2  StyleableTextFieldController({
3    required this.styles,
4  }) : combinedPattern = styles.createCombinedPatternBasedOnStyleMap();
5
6  final TextPartStyleDefinitions styles;
7  final Pattern combinedPattern;
8}
We have two member variables in this class: styles and combinedPattern. styles is of the type we have just created (TextPartStyleDefinitions) and is supposed to hold the styling information. So what does combinedPattern do?
Essential, we want to transform the list of style information into one combined regular expression. That’s because after that, we are going to use a function that splits a string according to one pattern.
So basically we just want the createCombinedPatternBasedOnStyleMap() to make use of | in regular expressions to glue together all regular expressions we define in our TextPartStyleDefinitions object.
 1class TextPartStyleDefinitions {
 2  TextPartStyleDefinitions({required this.definitionList});
 3
 4  final List<TextPartStyleDefinition> definitionList;
 5
 6  RegExp createCombinedPatternBasedOnStyleMap() {
 7    final String combinedPatternString = definitionList
 8        .map<String>(
 9          (TextPartStyleDefinition textPartStyleDefinition) =>
10              textPartStyleDefinition.pattern,
11        )
12        .join('|');
13
14    return RegExp(
15      combinedPatternString,
16      multiLine: true,
17      caseSensitive: false,
18    );
19  }
20}
What the method does internally, is mapping the list of TextPartStyleDefinition to a list of String (containing their pattern) and then gluing them together via join() using | as the separator.
This combined String is used as the input for a RegExp with certain parameters.
Now, back to the buildTextSpan() method inside our StyleableTextFieldController:
 1@override
 2TextSpan buildTextSpan({
 3  required BuildContext context,
 4  TextStyle? style,
 5  required bool withComposing,
 6}) {
 7  final List<InlineSpan> textSpanChildren = <InlineSpan>[];
 8
 9  text.splitMapJoin(
10    combinedPattern,
11    onMatch: (Match match) {
12      final String? textPart = match.group(0);
13
14      if (textPart == null) return '';
15
16      final TextPartStyleDefinition? styleDefinition =
17          styles.getStyleOfTextPart(
18        textPart,
19        text,
20      );
21
22      if (styleDefinition == null) return '';
23
24      _addTextSpan(
25        textSpanChildren,
26        textPart,
27        style?.merge(styleDefinition.style),
28      );
29
30      return '';
31    },
32    onNonMatch: (String text) {
33      _addTextSpan(textSpanChildren, text, style);
34
35      return '';
36    },
37  );
38
39  return TextSpan(style: style, children: textSpanChildren);
40}
41
42void _addTextSpan(
43  List<InlineSpan> textSpanChildren,
44  String? textToBeStyled,
45  TextStyle? style,
46) {
47  textSpanChildren.add(
48    TextSpan(
49      text: textToBeStyled,
50      style: style,
51    ),
52  );
53}
There is a lot going on here so let’s examine it step by step.
First, we need to understand, how splitMapJoin works. We do this by using an example:
1String sampleText = 'Every word in this text is uppercase. All other words are lowercase.';
2  String replacedText = sampleText.splitMapJoin(
3    (RegExp('word')),
4    onMatch:    (Match m) => m.group(0)?.toUpperCase() ?? '',
5    onNonMatch: (String n) => n.toLowerCase(),
6  );
7
8  print(replacedText);
Output:
1every WORD in this text is uppercase. all other WORDs are lowercase.
The function splitMapJoin() works this way: given a RegExp, it splits the whole String into matches and non-matches. Matches are those parts of the String that are matched by the RegExp. Non-matches is everything in between.
Inside the onMatch and onNonMatch callback functions, one can define the code that is executed for every part of the text. It requires a return value of String because the function combines all parts to a new string afterwards.
So in our case, what was written inside the onMatch function?
 1onMatch: (Match match) {
 2      final String? textPart = match.group(0);
 3
 4      if (textPart == null) return '';
 5
 6      final TextPartStyleDefinition? styleDefinition =
 7          styles.getStyleOfTextPart(
 8        textPart,
 9        text,
10      );
11
12      if (styleDefinition == null) return '';
13
14      _addTextSpan(
15        textSpanChildren,
16        textPart,
17        style?.merge(styleDefinition.style),
18      );
19
20      return '';
21    },
Like I said, every part of the text that matches a given RegExp, needs to be styled the way it was defined. So when onMatch is called, we need to find out, which of the patterns match. When there was no matching TextPartStyleDefinition, we return. Otherwise, we apply this style to a TextSpan and add it to the list of TextSpan we initialized earlier.
The onMatch function does not apply anything and just adds a TextSpan with the style from the method arguments.
Now let’s examine the getStyleOfTextPart() method:
 1TextPartStyleDefinition? getStyleOfTextPart(
 2  String textPart,
 3  String text,
 4) {
 5  return List<TextPartStyleDefinition?>.from(definitionList).firstWhere(
 6    (TextPartStyleDefinition? styleDefinition) {
 7      if (styleDefinition == null) return false;
 8
 9      bool hasMatch = false;
10
11      RegExp(styleDefinition.pattern, caseSensitive: false)
12          .allMatches(text)
13          .forEach(
14        (RegExpMatch currentMatch) {
15          if (hasMatch) return;
16
17          if (currentMatch.group(0) == textPart) {
18            hasMatch = true;
19          }
20        },
21      );
22
23      return hasMatch;
24    },
25    orElse: () => null,
26  );
27}
The aim of the getStyleOfTextPart() method is to receive a text part and then return the respective style information. In order to do that, it finds the first TextPartStyleDefinition, for which the whole match (currentMatch.group(0)) equals to whatever textPart is provided to this method.
If no TextPartStyleDefinition matches the given text, it returns null.
Reaping the rewards
Now that we have built a dynamic way of styling parts of TextField, let’s make good use of it and fulfill the initially set requirements: highlighting punctuation marks green and bold and articles red and bold.
 1class MyHomePage extends StatelessWidget {
 2  @override
 3  Widget build(BuildContext context) {
 4    final TextEditingController textEditingController =
 5        StyleableTextFieldController(
 6      styles: TextPartStyleDefinitions(
 7        definitionList: <TextPartStyleDefinition>[
 8          TextPartStyleDefinition(
 9            style: const TextStyle(
10              color: Colors.green,
11              fontWeight: FontWeight.bold,
12            ),
13            pattern: '[\.,\?\!]',
14          ),
15          TextPartStyleDefinition(
16            style: const TextStyle(
17              color: Colors.red,
18              fontWeight: FontWeight.bold,
19            ),
20            pattern: '(?:(the|a|an) +)',
21          ),
22        ],
23      ),
24    );
25
26    return Scaffold(
27      body: Center(
28        child: TextField(
29          controller: textEditingController,
30          autocorrect: false,
31          enableSuggestions: false,
32          textCapitalization: TextCapitalization.none,
33        ),
34      ),
35    );
36  }
37}
Providing a TextPartStyleDefinitions that encapsulates a list of our defined TextPartStyleDefinition, we are able to quickly set up style definitions for every part of our TextField. For the punctuation mark, we use a pattern that explicitly matches certain characters: [.,\?!]. Regarding the articles, we use non-capturing-groups.
Wrap up
In order to give the caller the possibility to partially style a TextField, we extended the TextFieldController and let it accept a list of style definitions which consist of a selector (a RegExp) and style (TextStyle). This creates a very flexible and powerful styling mechanism.


Nikhil
Marc
In reply to Nikhil's comment
Juan
Matt Gercz
Marc
In reply to Matt Gercz's comment